Saturday 13 October 2018

After the storm - a bare tree

Here is a card which I have made for the Crafters Companion one day special which begins today at 6pm on Hochanda. The fabulous inspirational sentiment stamps gave me the idea to make a scenic view for this card. I notice that Fiona Clayton (the presenter of the shows) has chosen to feature this card on her FB page so I guess its got her seal of approval.


what you will need:

Crafters Companion, Inspirational sayings stamp
Crafters Companion, Sheena, silhouette country lane stamp
Crafters Companion, Sheena stamping card
black card
black VersaFine ink pad
round circle punch/die
small heart punch
copy paper
pastel chalks

This is such a rewarding and easy card to make.

Firstly tear two strips of copy paper and using semi permanent tape secure them to a piece of Sheena stamping card. Punch out a circle which is going to be the sun in your picture and using the tape stick this onto the work area within the torn copy paper.

Begin to colour the area within the copy paper with the pastel chalks going from greens to oranges.
Remove the copy paper circle and shade the edges of the work by lightly applying black pastel chalk.

Stamp the image onto the work area using the black VersaFine ink (I have recently started using a stamp platform and I find it particularly useful for stamping silhouette stamps as you can re ink and re stamp the image over and over and never have faded or missed patches on your stamp).
Remove the copy paper (BIG REVEAL) and then stamp the sentiment.

Cut the card to the required size and mat and layer onto the base card.

I punched out some hearts from the left over pieces of pastel chalked card and stuck them around the sentiment but I only did this because I had acquired a few dark smudges and needed to cover them up. 


Friday 12 October 2018

Who knew Gelli could be so much fun

Hello crafty friends, I'm sharing with you today some cards that I have made using Crafters Companion "inspirational sayings" stamps which launch tomorrow on Hochanda. I bought some lovely stamps with beautiful uplifting sayings on them from Lylly of the Valley ages ago and they have proved very useful over the years but they only sell them as digi downloads now so I was more than delighted when Crafters Companion sent me these fabulous stamps.


What you need:
Crafters Companion, Inspirational Sayings stamps
Gelli Plate
water based (distress inks)

I have chosen these three cards because I made them using a gelli plate which is in my case is an A4 piece of gelli which I presume is silicone and it allowing me to do mono printing which is building up an image or background one layer at a time. I found loads of tutorials on Youtube which were really helpful and inspiring. The nature of this technique means that every print you make is unique, so I could probably make something like these cards again using the same colours but no two would be the same.
Basically I used distress inks and a brayer to create a background colour on the gelli plate and took a print of this onto Sheena stamping card. You clean your roller in between each print by rolling it onto a scrap piece of paper but this can create a good background effect too so dont just throw it away at the end. Then I just dabbed colour direct onto the plate from the ink pad and either blended it in a bit with the roller (or not) and then took a print from this onto the original background printed card. With card No 3 I laid the stencil onto the gelli plate and inked over it, then I removed the stencil and stamped some non specific writing onto the gelli plate (I would not recommend stamping words onto a gelli plate as it will print the words backwards) I then took a print of this. For card No 2 I inked up the square under side of the ink pad lid and stamped this onto the gelli plate and took a print of this. For Cards 1 and 2 I used the stencils as normal and inked over them direct onto the printed card.
Card No 3 was finished off by stamping the sentiment and then using a top from a pot of embossing powder to stamp the circles, I then coloured inside the circles with white ink. Card No 1 was finished off by adding a few butterflies which were die cut using the chic butterflies dies from Crafters Companion.

I had so much fun using the Gelli plate and cant wait to get it out again. The sayings in this set of stamps are so uplifting and are a nice size to use on a card or tag, something else I think I will go to again and again in the future.

Friday 28 September 2018

Sew inspiring

I`m sharing a couple of projects today which I made for the "weekend WOW" over on Hochanda. The shows kick off at 10 this morning and they feature a new collection called Sara sew which includes paper crafting things such as dies, papers, embossing folders but also includes sewing things such as fabric, Feu leather, embroidery cotton etc.


The pin cushion was made using the middle reel from the "zips on a roll" which I painted duck egg blue and then stuck all the accessories on which I had cut out using the dies that come in the collection and a few mulberry paper flowers and flower wire. The pin cushion I made from a scrap of material which I cut with a circle die that I already owned, I also cut roughly a smaller circle which would be the base of the pin cushion.. I made a running stitch around the edge of the circle and as I pulled the running stitch I stuffed the bag that would be the pin cushion. when the bag was stuffed enough I loosened off the running stitch and inserted the rough cut cardboard base, tightened up the stitching and tied it off. The pin cushion was then stuck to the top of the cotton reel with hot glue. To finish off the project I stuck some Daisy lace ribbon around the join of the cotton reel and pin cushion and finished off by sticking three satin Roses onto the lace..

The sewing hoop is a decorative hoop which is more like a frame which comes apart and I put some linen material onto the frame along with a piece of wide cotton lace. I trimmed the material and lace at the back to make it look neat. I made three zip flowers using the zips on a roll which are in the collection and stuck them onto the material along with three leaves which I made by ironing interfacing onto the back of a piece of linen and then roughly cutting out the leaf shapes, I then coloured the linen using distress inks. I stuck the flowers and leaves onto the front of the hoop using hot glue (there are youtube tutorials for making zip flowers and I wont lie they are very fiddly to make but well worth the effort). I took a darker piece of fabric and ironed on some interfacing then I cut out the tag shape and using one of the lace edging dies which are in the collection I cut out the bottom of the tag. I then stamped the sentiment which are in the sew lovely collection onto the tag using a dark grey ink. Finally I stuck the tag onto the linen fabric in the hoop and finished it off with a button and some satin ribbon.

This range is really inspiring and I do hope you get to watch some of the shows as it will give you lots of ideas for your own mixed media creations.

Saturday 18 August 2018

A magical place

The build a scene dies are on Hochanda again today and this is one of my favourite cards that I made as it looks magical with the moon shining through the trees.


This card was so easy to make and I started by cutting out a circle of copy paper to use as a mask for the moon and stuck it to the backing card. I shaded the background using pastel chalks and went in circles around the moon starting with the lightest colour and gradually getting darker to the edges. 
The card elements were cut from Sheena stamping card and shaded with a pencil along one edge and then further shaded with sooty black distress ink and a sponge.
I started with the back layer and worked forward and each layer forward was slightly darker than the previous layer until I reached the front of the card and I cut that from mat black card.
I added some frost to the elements along the shaded edges using a Spectrum noir crystal clear sparkle pen.

You can make these cards any size, the instructions say to cut a piece of card 5.5" square and then cut out the front frame but I would say cut out the frame from a larger piece of card and then you can make it deeper at the top and bottom as this card is. 

This set of stamps are going to be so useful as they dont have any Christmas or even winter accents and I was thinking of making a card using the fabulous Donna Ratcliff fairy stamps to make a background and turn it in to an enchanteed forest for a birthday card - watch this space.


Friday 17 August 2018

My own little world

Hello, I`m back again with a new project and so soon. Crafters Companion are launching some Christmas "build a scene dies" today at 6pm on Hochanda and I was lucky enough to make some samples for the show. I have to admit that when the previous "build a scene" dies were launched I thought they made fabulous cards but was glad I wasn't on that particular allocation as they looked really complicated, well I can tell you they are so much fun and not at all complicated.


They are made like the toy theatres we all used to make as kids but on these cards the scenery stays put and doesn't move around, unless you wanted it to and then you could always turn it into a theatre.
This set of dies is called yuletide treasure and comes with full instructions.
I cut out the front and back parts and then decided how to best decorate them, I then cut out the inner parts leaving extra card on the sides so that I could move the elements around and thus get a better idea of where things were going to be placed (this card was very straight forward as it was obvious that the fire place was going to be in the centre and the tree at the side). Once I was happy with the layout of the pieces I coloured them in and embellished them. Then I made the accordion sides by cutting two pieces of thin card to the same height as the front and 2" wide, I then scored lines from top to bottom every 1/4" (I used my big score as it has these lines already marked out). Finally I cut the sides of the element pieces to fit inside the accordion folds and I stuck it all together (usually from back to front but I think I did this one from front to back).

The finished card is like a box but it is open at the top and bottom and completely free standing but can be folded fairly flat for postage.

..............................................................................

I hate it when people dwell on an illness, not that I don't understand but my Mother was a life long hypochondriac and my first thought is always shut up moaning and get it sorted. Well Ive been a bit poorly this last week or so with depression. I don't usually get it bad (I know some people are unable to move and get constant anxiety attacks) and it usually manifests itself as feelings of doubt and self loathing combined with many tears for no reason. Yesterday was a particularly bad day with tears flowing everywhere and really bad feelings of self doubt and all I wanted to do was sit in a chair and cry but I knew that this would make me feel guilty and more unworthy for being so self indulgent and doing nothing, so I took myself up to my craft room. I knew I had an allocation which I am now way behind with because I haven't wanted to start it as I felt I couldn't concentrate what with all the inner voices telling me how useless I am (I must stress that I am not looking for praise or pity or anything like that at this point, its just that I have these conversations with myself and I beat myself up for no real reason) so I just sat at the desk and let whatever wanted to be crated happen. I wasn't expecting a finished sample but after about three hours I had mocked up a card and so I went to bed. Today I feel less stressed and more like me and I think the crafting I did yesterday helped a lot, it certainly took my mind away from the thing that is causing me to be anxious and it put those inner critical voices to the back of my mind. 
 I have been reading a book by Ruby Wax called Frazzled and I can highly recommend it for any one who suffers with "black moods". The first step on the road to recovery is knowing you are not right and for me also knowing what has caused it and in this book Ruby teaches how to look for the answers whilst also giving coping methods for recovery.
I know what is causing this episode of my black mood and as always its the realisation that I am not in control of my destiny or any thing for that matter and the inevitability of change. Today is a new day and I feel like I want to crate so that makes it a good day, I can take back control even if its only of the little things like making a card.

Tuesday 14 August 2018

If you cant do Goth at Christmas when can you do it?

Here is another card made using the 3D embossing folders which are on Hochanda today at 1pm and 5pm. I thought this card looked quite goth when I was making it and I tried to find some Gothic manuscript writing to use for the card background but couldn't find any. I absolutely love colouring in these embossed images as I have to control my breathing so as not to go over the lines and then it all becomes very calming and zen.


I  used a Keisercraft marble stamp and walnut stain distress ink to make a marbled image onto Sheena stamping card, then I embossed the card and cut it down to size, I shaded the card with vintage photo distress ink and then coloured the letters using Spectrum noir onyx black sparkle pen. I used my Spectrum noir aqua pens to colour the leaves and a Spectrum noir aqua tint pen - berry red to colour the berries. I rubbed at the sides of the topper with a sanding block and tore it here and there to make it look aged and unloved.
 I took a piece of cream card and using vintage photo distress ink I second generation stamped the Keisercraft stamp to make another marble background. I cut the card to size and shaded the edges using more vintage photo ink.
I used a piece of hessian and ribbons to finish the card.


Monday 13 August 2018

Do you believe

This is another card Ive made for the Crafters Companion "one day special" on Hochanda today (6pm) and this features one of the Christmas words 3D embossing folders. I think we are all guilty of buying embossing folders and then not using them that much but with these folders which are definitely the star of any card you should use them like a 3D stamp and have fun colouring them in.


The background is made using the glycerin method and I used twisted citron, stormy sky and tumbled glass distress inks, I then splodged water over the coloured card and blotted it off.

The embossing folder is a regular 5" x 7" and I think this is another reason we don't use embossing folder that much because its an odd size but as you see here it can be cut down. 

Once the background card was completely dry (it didn't take long in the heatwave we were having at the time) I embossed it - I have learnt that it is better if you put the embossing folder through your machine with the hinged part nearest you and then if the card wanted to slip it has no where to go.

Now the fun begins colouring in the design. I used a Leoni Pujol sparkle pen arctic to colour the actual word and I liked the brush tip for getting into the fiddly lines. I used a gold gelly roll pen for the foliage and a Spectrum noir aqua tint pen red berry to colour the berries.

I really lightly rubbed the rope part of the embossing with stormy sky distress ink on a piece of cut n dry and when I say lightly I mean I barely touched it.


Sunday 12 August 2018

How to cheat at crafting

Tomorrow sees yet another Crafters Companion one day special over on Hochanda and it will be some Christmas 3D embossing folders. There is a set of large sentiment embossing folders which will be the centre piece of any card that is made with them and then there are some rather beautiful image folders. I have used one of the image folders to make this card and  have embossed parchment which is really a cheats way of parchmenting but it looks so effective. The colouring in is so theraputic I didnt want to stop.


All you need to do is emboss the folder onto parchment and then from the back side outline the detail with a white gelly roll pen or a white pencil then colour in the detail (I used Spectrum noir aqua pens). 
Cut the finished work to size and then cut mat and layers for it to sit on on the card base. Stamp a sentiment onto cream card and secure the sentiment and topper in place with gold brads. 

The only problem with using parchment is that you have to use brads or in some way disguise how you secure the parchment because any glue that is used will show through on the finished card and spoil it.

..............................................................

I am so glad that the weather has cooled down and I can get so much more done. Its raining here and boy does the garden need it. 
I had a craft day with my sister on Friday and we had a play with colours using glycerin and splodges and my T shirt, hands, desk and any thing else in the way was covered when I had finished. My new stamp platform arrived yesterday and as I had a project to make using lots of word stamps I set about making a word cloud (I will show you thee finished thing in another blog as its secret stuff for now) and I couldn't have done it and gotten it all lined up and straight without the stamping platform, I'm well impressed.

Friday 10 August 2018

Fabulus at 50

Here is a quick and easy little card which I have made for a good friend who had a big birthday yesterday. I do love these stamp and die combos and I`m sure you will be seeing lots of cards from me made with them.


what you will need:
Crafteers Companion Cupcakes stamp/dies set 
Crafters Companion, birthday party, fun with numbers dies
Craffters Companion little angel 12" x 12" paper pad
Sheena stamping card
Spectrum noir crystal clear sparkle pen
Spectrum noir red berry aqua tint pen
Sekura white gelly roll pen
black fine tip pen
distress inks (to colour in the cupcakes)
yellow glitter card

This card is so much fun to make and the first step is to fold a piece of A4 card in half, decide where you need the stamped image to be on the outside of the card and either stamp the image and then die cut or die cut and then stamp - it`s up to you which you prefer. Trim the card to size top and bottom.
Colour the image using distress inks and a water brush.
Add sparkle to the icing using the sparkle pen and add a white bit to the cherry to look like it is shining.
Die cut the spotty paper from the paper pad with the other half of the die. Cut this paper to mat and layer onto the front of the card and stick in place on the card.
Stamp a sentiment using one of your own stamps or if you like to use a graphics program make a sentiment and print it out. Draw freehand around the sentiment using a fine tip black pen, cut the sentiment out and stick onto the front of the card.
Die cut the numbers from the glitter card and stick onto the card.
Using a ruler and the fine tip black pen draw a border/box around the inside of the card (I find it easier if you push the pen away from you rather than drawing it into you, the ink is a smoother flow).

Just in case yourey wondering how to be fabulous at 50 the inside sentiment reads "just keep doing what you did when you were fabulously 49".

.........................................................

I took this card and present to my friends yesterday morning and when I got there she was already drinking bubelly, she does know how to live. I on the other hand was not having a special day and stuck to a cup of tea.


Monday 6 August 2018

One of my faves

It`s another Crafters Companion one day special today on Hochanda at 6 and it`s Christmas stamps and dies. I absolutely love this idea of stamping the image and then having the dies to fussy cut it out or as I have done with this one just cut out one edge, I think these are my favourite craft items at the moment and I can see my own Christmas cards being made from these. There are 10 images in total and they are all fabulous and can be as quick and easy or as complex as your imagination allows.

 
This cut on edge card is made using the Poinsettia stamp/dies and the only thing you have to remember is not to fold the card until you have made the die cut. Once the cutting out has been done you can stamp the image and then fold the card.
I used a paper from my stash for the backing paper and the sentiment is from the Crafters Companion, festive phrases stamps.
The little holly leaves on the sentiment are made using a Woodware punch that I have had for years.
 
............................................................................
 
I`ve had a busy time of it since my last blog with lots of secret craft stuff going on and then on Friday I went along to a workshop with John Lockwood. He was such a lovely man and I learnt an awful lot. One of the things I learnt was that I need a stamping platform and I had only ever heard of the Tim Holtz one but as John said this one is made for the American market and is not designed to use with clear cling stamps as they do not have these in America. I have now ordered a Stamps Too press to impress stamp platform which is the one we used in the workshop. I know it would have worked a treat with the Crafters Companion one day special stamp/die combo. Here`s the two card that I made with John, the black and white card is a shaker box card made using his new die sets.


Monday 30 July 2018

Well I wasn`t expecting this

Crafters Companion are having a one day special on Hochanda starting at 6pm today and that is the unexpected bit because I thought that the samples I had made for the show were going over to America to be launched. So here is a card I have made using the Poinsettia frame 3D embossing folder, it is such a lovely folder to use.


I simply embossed some mat black card and then coloured the design in using mica paints (the ones in little pots that you have to activate by spraying on water), it was so therapeutic like those adult colouring in books. The tinier tendrils and pink berries I coloured using Spectrum Noir metallic pens and a white gelly roll to dot an accent highlight on the berries.
The sentiment is cut from Crafters Companion gold luxury cardstock using Crafters Companion festive words 1 dies. 

All the embossing folders in the show are beautiful and fun to work with, its funny but I never really think to buy embossing folders and then when I use them I think I should use them more often.


Saturday 28 July 2018

Reach for the stars

This is a little tag card that I have made for the Little Claire shows on Hochanda today at 11 and 2. I have been making Christmas cards and gifts since the beginning of June and I think this card was one of the first.
Little Claire have some star themed stamps and this image is taken from one of those sets.


Its a bit of a fussy card but basically its the image stamped, coloured in and then fussey cut. The backing paper was cut out using my scan & cut machine but if I didn't have it I would have cut the bottom part of the tag as an oblong shape and rounded the corners with a corner punch. The sentiment is Lilly of the Valley (they have started to have shows on Hochanda). The tag card base is also featured on the Hochanda shows but Little Claire sell it direct from their website.

.................................................

We finally got the long promised rain yesterday and boy did it rain. It was like a tropical storm with thunder constantly rumbling for hours and with it came hail stones and winds which blew the BBQ and table & chairs over. It was lovely and refreshing outside but I had to shut the windows to stop the rain from coming in and then it was like an oven inside the house. Today the birds re singing again and the garden although littered with bits of tree is looking much fresher. I am spending the day with my friend and we are going on a shopping trip but Karen is a tenacious lady and once we are out we don't come home till the shops close. I have a delivery today of more secret stuff from Crafters Companion and I don't know if its for the next allocation or a magazine commission which I have taken on. To be continued...........

Thursday 26 July 2018

I`m seeing stars

OK so Christmas seems like a long way off especially when we are in the midst of a heatwave but this is the time of the year when well organised crafters start to do Christmas. This card is showcasing another of the new stamps from Little Claire and  is one of their stars stamps.

I have used my brusho pigments to create a background and then when it was dry over stamped the image. I used a really old Kanban set of snowflake stamps to create the stamped detail to the side of the card and the sentiment was made using a Inkylicious stamp.  

.........................................................

Yesterdays trip to Lincoln was really enjoyable as I took the train and I just love off peak train journeys. The Chinese supermarket was fabulous and as most of the products were labelled with Chinese writing I was so glad that the shop assistant was happy to spend time with me explaining the produce. I have an old Ken Hom cook book which I love but some of the ingredients are not to be found in the ordinary supermarket. The fabric shop was less inspiring but I will call in again when I'm around. I have more secret stuff for Crafters Companion to be getting on with today (Christmas cards) and I am eagerly awaiting my Crafters Inspiration magazine but I know that once that has arrived not much work will be done for a few hours whilst I look through it again and again.


Wednesday 25 July 2018

Playing chase

I will be sharing the samples that I have made for the Little Claire Hochanda show on Saturday all this week and as I showed you a cat card yesterday I thought it only right to keep the balance and show you a doggie card today.


This is such a quick and simple little card to make and the only tricky bit is masking off the card ready to colour with distress inks. The base card is sold by Little Claire and you work direct onto the card so no mat and layering. I use black Versafine ink when stamping but with silhouette stamps I sometimes need to fill in gaps and I use a black uni.ball signo pen for this.

......................................................................................... 

Today I am going to Lincoln shopping with my sister Pauline so I hope the sun isn`t too exhausting. When I used to live in Yorkshire I went to Leeds quite a lot and there was a Chinese shop in the market which sold the best Chinese take away style curry and I`ve heard that there is a Chinese supermarket in Lincoln so I`m on a mission to find it as I`ve run out of curry paste now. There is also a fabric shop in Lincoln which has the most fabulous haberdashery department so I must take a look whilst I`m there, I might not ever come out if it is as good as I`ve been told.

Tuesday 24 July 2018

New Cats from Little Claire

Hello there, today I want to let you know that Little Claire have a show on Hochanda this Saturday at 11am and I have been lucky enough to play with their new stamps and make some samples. There will be a cat stamp set and a dog stamp set and so I chose to use the cat stamp set first.


I made a mask for the background circles using copy paper and various sized circle dies, then I laid the mask onto white card and coloured in using salty ocean and bundled sage distress inks. I stamped the image on the card making sure that no circles were visable below the image and shaded below the image. I cut the image topper down to size and over stamped the catkin foliage around the top and sides. I coloured the image in and mat and layered it onto the base card. Finally I stamped the sentiment onto a spare piece of background card, cut it out and shaded around the edge with black ink, then stuck this onto the card using 3D glue.

I do love this range of cat stamps but then I am a bit biased.

..............................................................

Well I hope you have all managed to cope with this heatwave we have been having. Yesterday I harvested a load of veg we have been growing and it is a whole month early this year. We have had the luxury of being able to water our veg but the farmers are struggling with the crops in the fields and I have to say that the fields around here are yellow and very dry looking. The other day we came across some people clearing up a spillage in the road of Rape seed so that is early this year too. The poor kitties Roger and Rosie have been lethargic and just lay around looking at me as though its all my fault for turning the heating up, and I do feel for them in their fur coats. I am on school holidays now and had planned to get loads of things done but the heat has made it impossible to do any thing, well that's my excuse. Its still Christmas in my craft room although playing with snow and frosty scenes doesn't make a difference to the temperature as my craft room gets the sun all day.

Monday 9 July 2018

Christmas in black & gold

It`s baking hot here at Hugill towers and that can mean only one thing - its time to make Christmas things. Yes I have been doing Christmas ever since this hot spell began and today I am showing you a card I have made using the Crafters Companion dimensional dies which launch today over on Hochanda. The range includes some fabulous dies, stamps, embossing folders and printed papers which would become a staple in you Christmas craft stash.


This particular die set is called sleigh (suprise, suprise) and yoou get one sleigh and one Reindeer so I cut out two Reindeer and added Reindeer which I stamped using the sleigh accessories stamp and placed them behind the pop out Reindeers. The sleigh is embossed using part of the the Christmas centrepiece embossing folder and the sentiments were cut using the festive words dies 1 & 2. The whispy gold lines were made by tearing a piece of copy paper and laying it down onto the card as a mask then rubbing along the edges with a gold ink pad. I made the front of the card using the Holly swirls embossing folder and Pebeo empire gold gilding wax.

The dies for the pop out section of the card have slits cut into them so you can easily line them up with the centre fold of the card. I did this by drawing a line on the card, cutting out the shapes and then folding the card. It isnt a difficult card but you do have to work out where all the elements will be placed before you begin cutting. 

....................................................................

I am still making secret Christmas stuff for the Crafters Inspiration Christmas magazine and then more Christmas cards for future Crafters Companion shows. It is really difficult to feel Christmassy when my craft toom is south facing and gets the sun all day long. I was so hot yesterday at work (I work in a kitchen) that I had to go and stand under the fan in the walk in food store with my shirt unbuttoned for five minutes, it was heaven.


Tuesday 19 June 2018

Some moody looking Dandelions

Did you see any of the new stamps and die sets that were launched last night and are on again today as the one day special? I have ordered the cup cakes and tea cups sets for myself and cant wait to have a play when they arrive. This is a card that was featured on the shows although it is much more colourful in real life, I`m not sure why it looks so dull on here.

 
This is a simple card which shows how you can use the dies to cut either side of the image without cutting out the image completely. I have to confess that I used my scan`n`cut to cut out the mat and layers but it would look just as good without the mats.
 
I used pastel chalks on Sheena stamping card to make the ombre coloured background and then stamped the image using stormy sky distress ink, I then 2nd generation stamped the Dandelions in the background.
 
I die cut either side of the end pieces then I simply cut across the top and bottom of the card making sure that it was level. The card looked a bit bland so I used black glitter on the centre of the darker Dandelions. 
 
In order to use the scan`n1cut I drew around the outside of the topper on to copy paper using a black biro, scanned this into the scan`n`cut and saved to direct cut. I increased the border by 2mm and cut out of black card, I then increased the border a further 2mm and cut out of white card twice.
 
I stamped the sentiment then added the raffia tie to the bottom of the design. I stuck the topper onto the black mat and then onto one of the white cut out mats. I made a hinge to run along the top edge of one piece of white cut out card and stuck it into place on the inside of the front card and then onto the inside of the back card and finally trimmed the hinge to size.


Monday 18 June 2018

Sunny Sunflowers

I`ve been playing with some fabulous, fabulous secret stuff from Crafters Companion this morning and almost forgot to do a blog for the launch of the Gemini on the edge sets which are on Hochanda today. Here is a card which I made using the Sunflower stamp to create a beautiful vintage background.


This card is so easy to make and its a technique that is so simple.

I stamped the Sunflowers randomly onto Sheena stamping card with black VersaFine ink. Next I used spiced marmalade distress ink to ink up a brayer. I rolled the brayer once onto copy paper and then continued to roll the brayer over the stamped sunflower image until the ink was all used from the brayer. I turned the card 90 degrees and repeated the process of inking the brayer, rolling the brayer onto copy paper and then onto the image. When the colour on the image was right I allowed the card to dry and cut it to size. The colour was a bit intense at this point and the Sunflowers were a bit lost so I placed a wet wipe over the card and patted it gently (do not rub), The result when the card dried was a much paler colour and the black ink on the Sunflowers had begun to feather just a little making the image look like old distressed wallpaper.

The sentiment was made using the celebrate die form the 2017 Crafters Companion Advent calendar.


Thursday 14 June 2018

A bold statement

Today I am sharing with you another of the fabulous stamp and die sets which Crafters Companion are launching on Hochanda on 18/19th June. This card features the Dandelon stamp from the set of the same name.

 
This card was so much fun to make and I got to use my new set of Brushos which I got for my birthday.
 
I made the background first by spraying some Sheena stamping card thoroughly with a spritzer. I then threw on some brilliant red brusho and sprayed the card again, then I picked the card up and held it one way and then the other to let the colour run, when I was happy with the way the colour had spread I added some rose red brusho along one edge of the card to make this edge darker and sprayed it with more water. Again I manipulated the card to make the colour run and create the desired effect. Finally I left the card to completely dry.
 
I stamped the Dandelions using black VersaFine ink and cut the card to size.
 
The sentiment was cut from black card using the sentiment dies from the Crafters Companiion, flutterby, scattered Butterflies dies.


Wednesday 13 June 2018

We all love a Sunflower

Hello crafty people, its been a while. I have been busy working on secret stuff as always but today I can share some secret stuff from Crafters Companion who will be launching some stamps with matching dies which fussy cut around them and they are fabulous. I only got two sets to play with but I think there are 13 in total and I will have to have the Poppy, cocktail glass, cupcakes and teacup sets when they go on sale. The launch is on the 18th and 19th June on Hochanda and as it is over two days I would guess it is a TSV.


This was the trickiest of all the samples that I made but I am showing it first as it illustrates the concept very well.
 
The stamp is a clear cling stamp (always my favourite kind of stamp) and the dies come in two halves so you can have the design on the edge as in this card, or as a fussy cut topper which you will see in my other posts. This set is called Sunflowers and I loved colouring it in with my Spectrum Noir aqua pens and a water brush.
 
I printed off the green paper from a Crafters Inspiration CD and also a blue spotty paper which when printed was more grey than blue so I had to look pretty hard for the right paper from my stash and this blue and white spotted paper is from the NitWit pastel dreams paper pad.
 
I then made the card too wide on the left hand side and couldn't`t decide how to make this look right so in the end I added the flowers and leafs to the lace to fill up empty space.
 
As they say in crafting "there are no mistakes" and I think this one turned out all right in the end.
 
......................................................................
 
I have been busy in the garden and at work doing extra hours and of course busy with DT work so the time has flown by since my last blog. I am suffering at the moment with a summer cold (thought it was hay fever at first) which is making me miserable and my crafting skills have disappeared. Stu is keeping me going with lots of cups of tea and apart from that generally keeping at a distance (he knows that's the best course of action when I`m ill) and of course Roger and Rosie are being good nurses and giving me lots of furry cuddles.  


Monday 28 May 2018

I love a good show

Hello crafty friends I hope you are enjoying this bank holiday weekend. We had the Oyster Papercraft Show yesterday at Forest Pines which is a golf resort not far from where I live here in Lincolnshire. I had never been before and it was reported to be only a small or mini show so I didn't have high hopes but thought well I need a few more distress oxides so I`ll pick them up there. Well it was a fabulous day, I picked my sister up nice and early and off we went on an adventure as I was driving and I don't normally do that when I haven't been before. 
The venue was absolutely beautiful with plenty of parking and inside it was a function room which was split into two, half filled with stalls selling all kinds of crafty goodies and the other half full of tables for make and takes which were free. I didn't bother to do a make and take as I was blown away by the variety of things the sellers had brought and I kept going round and round not wanting to have missed any thing. 

 
Here is a photo of one of the craft stalls which was mostly selling card and embellishments, my sister is the lady in the middle of the picture wearing glasses and I am the lady with blond hair and a hair band stood with my back to the lady in pink. It was only £2 entry fee on the door but we booked in advance so it was £1 for us, this is very reasonable for a craft show.


These are some of the goodies that I bought, I said to Pauline when we were having a drink in the bar later that I would get home and think I "I wish I`d bought" but at that moment I didn't think I wanted any thing else. Sure enough I was sat at home last night and thought I wonder how those gelli plates work that I had seen on one of the stands? I had a look on YouTube and now I wish I had bought one, they do amazing things. That's the thing though because if I hadn`t seen a gelli plate at the show I wouldn't have looked on YouTube so even though I didn`t do a make and take I did take the beginnings of a crafty idea home with me.
If you have never been to a craft show like this one where you can buy craft making goodies I really urge you to go as the products are usually cheaper than you might find in a shop and the stall holders and crafty people there are always full of knowledge and willing to share it. I love looking at the cards on display at the stalls and get lots of inspiration from them, even though I make cards for display at craft fairs for Little Claire I am always in awe of the cards that other people have made.


Friday 25 May 2018

Admin notice

Hello crafty friends, this post today is to make you aware that the law about data protection (GDPR) begins today and as a result I have added a page to my blog explaining what this means and how it affects you when you visit this blog or leave a comment on this blog. I just want to add that I never share information (personal or other wise) left on this blog with third parties but of course third parties are free to read any comments that may be left. I do really appreciate that any one would be interested enough to read or leave a comment on my blog so please keep doing so, it means such a lot to me.
If however you do not wish to receive my blog any more please leave a comment to say as much and I will remove you from my mailing list.

Now that's the legal red tape done and I would just like to say a BIG thank you to my fellow blogger friend Marianne Fisher for letting me copy the legal terms from her blog which is Mariannes Craft Room and well worth a visit.
 
.......................................................................................

I am very busy at the moment with DT work and have just finished some cards which are to feature in the Simply Cards and Papercraft magazine which will be on sale on 26th July. I have also got some new dies to play with from Crafters Companion and stamps from Little Claire so my bank holiday is going to be spent mostly in the craft room. I am so excited to be going to the Oyster Paper Crafts show and demo day on Sunday so I will try to take some photos to post on here. I love paper craft shows because the sample cards on display are really good for inspiration and to see the products demonstrated is fabulous, however the down side is it costs me a fortune.

Tuesday 1 May 2018

A busy end to April

I feel like I`m a bit late to the party but after my friend on the Crafters Companion DT had a crafty clear out and sold some of her stash I have become aware of crafting de clutter sites on FB. I haven't bought any thing from these sites yet but what a fantastic idea to organize your craft stash and make a bit of money for your next purchase.
Any how as I mentioned my friend was selling off her unloved stash and I bought this rather cute Penny Black Hedgehog stamp from her and I knew straight away who was going to receive the card I made with it.

 
I made this simple little card for Stuart who had his birthday last Thursday.
 
The Hedgie stamp as I mentioned is a wood mounted Penny Black stamp and the sentiment is a much loved and used Woodware clear cling stamp. I coloured the image using water pens, distress inks and a fine tip water brush. The bakers twine is thick  bakers twine.
 
Poor Stuart doesn't always get a home made card from me and I felt really guilty last year when he was 70 and I didn`t have time to make his card and just stuck the numbers on a shop bought one.
 
....................................................................
 
It was my birthday on Sunday and although Stu and me are only three days apart with our birthdays we are eighteen years apart with our age, but age is just a number and aren`t all men just boys at heart. I received some fantastic hand made cards from my family and I will show them to you when I`ve had time to photograph them. I got a voucher from my eldest sister and have just been online and bought another set of Brushos. I do love my Brushos but I felt a bit limited with the colours I already had, so when the new box arrives I cant wait to have a play.


Saturday 28 April 2018

Its a bit wishi washi today

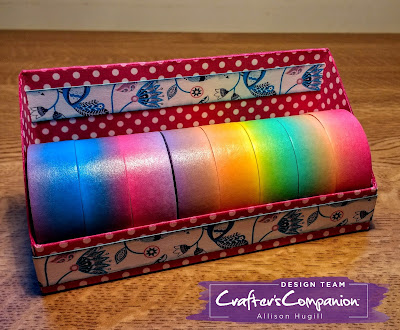
Hello crafty friends, It`s national stationery week (yes there is such a thing) and I was asked by Crafters Companion to make a washi tape box as part of this event.


This is the box that I made and you can find details of how to make it yourself including a template and even free downloadable digi papers on the Crafters Companion blog, sadly you will have to provide the washi tape. 

Wednesday 25 April 2018

With a friend and a cuppa you could put the world to rights

This is a card that I have made for a very good friend who has her birthday on May the 4th (be with you), and yes that is how I remember it. My friend and me love to go out for tea and a cake so this image is just right for us, I think I am the one in the hat. It`s a side stepper card using the template from my previous post "cupboard love" and I do think that this template is a really useful size.


The stamp is an old fave from Lilly of the Valley called "coffee break". I know they have stopped selling their rubber stamps but this image is still available as a digi download which in a way is better because you get it straight away. I used watercolour pens and a water brush and distress inks with a water brush to colour the image.

The backing papers are NitWit "Hydrangeas too" downloadable backing papers which I printed onto Hobbycraft 300gsm A4 premium card (I also used this card to make the base card).

The large sentiment is from the Crafters Companion, Hollie Hobby, time for tea stamp set and I used a die from the X Cut, large tags & plates dies to cut the shape. The two small tag sentiments are made using Lilly of the Valley, digi stamp set 24.

I finished the whole thing off by making a box for the card and I have to say that using the Big Score from Crafters Companion makes any box a complete doddle to do. The top of the box was made using Crafters Companion, create a card, "floral bouquet" die.


Saturday 21 April 2018

Cupboard love

This is my final card for the Little Claire Hochanda show (today at 2pm) and it is a side stepper card. I put off making side stepper cards as I thought they were really complicated to do, but once you have seen one it all makes sense as they are very easy to make and a bit different as I haven't seen anything like them in the shops.

 
To begin making the card you need to cut the side stepper card from a sheet of A4 300gsm card. The template below gives you the measurements and then all you need to do is trim the right hand side down to size once you know how big your sentiment will be. I found the instructions for making a side stepper card on YouTube and then I simply adapted the measurements to fit this stamp.
 
 
The stamped image is coloured using water colour pencils and as I have mentioned in previous posts I find these good to use on smaller detailed colouring in projects.
 
The backing papers are Nit Wit papers from 8" x 8" paper pads "pastel dreams" and "country meadow".
 
The first part of the sentiment comes with the stamp but I didn't think this was enough to fill the space on the card so I wrote "and the secret ingredient is love" in my graphics program and printed it out onto good quality mat print paper, then I stamped the sentiment above it.
 
I hope you have a go at a stepper card (they really are fun to make).


Friday 20 April 2018

It`s TIME for mixed media

This altered art card is another one that I have made for the Little Claire show on Hochanda tomorrow. As the stamp is all about clocks I wanted to make the background look like an old plastered wall where the lats had been exposed.

 
This card is built up in layers and first of all I ripped down some corrugated cardboard to expose the inside and then I ripped it to the size I wanted (run around the edge of the cardboard with a water brush to get the cardboard wet and then gently tear).
 
I stuck the corrugated card to a piece of backing card with PVA glue and allowed it to completely dry.
Next came the colouring in and I did this by applying a layer of gesso all over the corrugated card and on to the backing card, once dry I added a muddy coloured emulsion paint but still leaving the gesso exposed in areas. I further shaded using various distress inks and I stamped a script lettering around the edges using one of the distress inks. I added Ranger crackle glaze to areas of the wall and when it was dry I shaded it with distress ink. The little mouse footprints were stamped where I could find a space although if I were to make this card again I don't think I would add these. Finally I shaded around the edge of the piece of card with black distress ink.
 
The stamped image was stamped onto copy paper and coloured in using water colour. I tore around the edge of the image using a water brush to mark the line of the tear as with the corrugated card and then I shaded the edges with distress ink.
 
The little cogs were cut using the embellishment part of the Crafters Companion "timepiece easel" dies.
 
.............................................................................................
 
I went back to work yesterday and was stuck in a baking hot kitchen on the warmest day of the year so far, I thought I was going to melt as we are not allowed fans or open doors to cause a breeze.
 I ordered some new wellies which arrived yesterday whilst I was at work and they are purple and fabulous. I had to get some new wellies because on Monday I went next door to get some horse manure and my neighbour took me across the field to the miden saying how boggy it was and to be careful where I put my foot. Sure enough as soon as we got there I lost my wellie in a massive puddle and then put my foot down knee deep into very very soggy horse muck (yuck). Ian my neighbour rescued my wellie after he had stopped laughing and after we loaded up the wheel barrow I walked back across the field with my soggy foot in my soggy wellie making farting noises. I decided to throw my old wellies out as they would never smell the same again.


Thursday 19 April 2018

Out of my comfort zone

I`m sharing something a bit different with you today, some construction. I have made all of these gift boxes using the Crafters Companion "big score" score board, big score DVDs and new A3 card which is launching today on Hochanda at 6pm as a one day special.


Accordian file

Cut down wine box

Self closing pouch
 

Twist tea light box

Chocolate box
 
what was used:
 
I was a bit nervous about making these boxes at first as I`ve never attempted any thing so complex but using the big score board and DVDs it was easy. The card is amazing and just the thing for construction projects as it folds beautifully, doesn`t crack and is just the right weight, not to mention the gorgeous shabby chic designs. Unfortunately I can`t give you any templates or tips on how to make these boxes but all the details are on the DVDs "the big score video project DVD" and "the big score advanced projects DVD". Of course you could just buy the beautiful card and make projects of your own or projects found on YouTube and Pinterest. I would just add that I like to use Collall tacky glue to glue the boxes together as this is super strong and doesn't take long to dry, nobody wants a gift box to fall apart once you`ve put all that work into making it.