Tuesday 31 October 2017

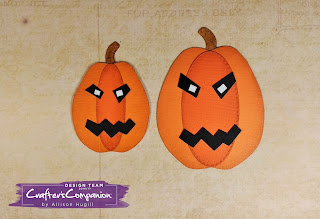
Happy Halloween

This is a simple Halloween card that I was going to give to my niece for her birthday yesterday which is why the sentiment says "happy birthday" instead of "happy Halloween" or something equally spooky but you could change the wording as you wish (I quite like "you are my favourite pumpkin"). I made this card to put on the Crafters Companion blog so I took pictures of every step and that is why this recipe is full of pictures.


what was used:


Crafters Companion sentiment die
Crafters Companion Gemini die (free with Gemini machine)
stitched oval dies
5" x 5" craft base card
orange & dark orange linen card
black card
craft card
Tim Holtz distress ink - vintage photo, wild honey, peeled paint
black green & white card scraps


This is such a fun easy card to make and a good project to get the little ones involved in.

Cut a piece of craft card to fit inside the base and shade the edges using the vintage photo and cut n dry foam.

Mat the craft card onto black card and stick to the base card.

Using two of the oval dies cut the shapes from the darker of the orange linen card. Shade the edges of the shapes with the distress ink.

On a piece of scrap paper make a template for the pumpkins by drawing a pumpkin shape around the oval cut outs. Fold the paper along the middle of the shape and cut out.

On the back of the lighter orange linen card draw the pumpkin shape and cut out. Shade the edges of the shapes with the distress ink.

Stick the oval shapes over the pumpkin shapes.

Cut the shapes you will need for the pumpkins eyes, mouth and stalks.

Shade the stalks with distress ink and then stick all the pieces in place on the pumpkins.

Stick the pumpkins onto the base card at a jaunty angle.

Die cut the sentiment words from black and light orange card, stick the words over one an other to form a drop shadow.

Stick the sentiment words onto the card. Cut out the leaves using the Gemini dies from green card scraps and stick in to place. Finally cut a two thin strips of green card and make into a spiral by pulling tightly against a boner tool, stick the spirals onto the card.

............................................................


Monday 30 October 2017

Happy birthday Debbie Xx

Today my niece has her 40th birthday and I have made this card for her. I didn't know weather to make a Halloween birthday card as I was busy making Halloween things for the Crafters Companion blog (take a look if you dare) but decided against it in the end.

 
what was used:
flourish embossing folder
Tim Holtz,THS032 Flourish, stencil
Tim Holtz distress inks - picked raspberry, Fossilized amber, spiced marmalade, mustard seed
orange pen
Pebio gilding wax
Versamark stamp pad
fine detail gold embossing powder
8" x 7" cream base card
black card
5mm peach ribbon
8mm orange gem
mister bottle
craft mat
 
This card used a lot of techniques but once the background is created the rest is easy peasy.
 
Make the background by dabbing directly onto the craft mat with the spiced marmalade, fossilized amber and picked raspberry distress inks (near to each other but try not to have them touching). Spray the ink dabs with the mister until water droplets can be seen. Cut a piece of Sheena stamping card in half and roll it over the inks. Dry the card and repeat the process until the desired pattern is achieved. Allow the card to completely dry and cut to required size, lightly rub over any white areas with mustard seed distress ink using cut & dry.
 
Place the stencil over one corner and apply the Pebio gilding wax. Remove the stencil and repeat at the opposite corner. Allow the gilding wax to completely dry.
 
Stamp the sentiment with Versamark and apply the gold detail embossing powder, emboss with a heat tool. Cut the sentiment out and colour in the words using the orange pen.
 
Decide where the sentiment needs to be on the topper and place a strip of the satin ribbon down the side of the topper.
Mat and layer the topper onto black card and then onto the base card, cut the base card down to size.
 
Cut the numbers from the gold card and emboss with the embossing folder. Stick the numbers onto the card.
 
Stick the sentiment onto the card along with the ribbon and the gem.
 
 
I used Stick & Spray to glue the numbers to the card and a hot glue gun to glue the sentiment, ribbon and gem to the card.
 
................................................................
 
My niece loved her card and put pictures of it on Face Book, here is the box I made to put it in.


The weather looks like its going to be good today and I have a load of washing to do so that's the first of my jobs. I have some samples to make for Crafters Companion and one of them is a cushion cover which I have made but I just need to nip into Market Rasen and get a cushion bale to stuff it with, I cant wait to share those samples with you. I had a great shopping trip with my friend on Saturday, I thought I could shop but she wore me out. We had tea and cake and then we were shopping for so long that we had to go for another cuppa but no cake the second time.


Wednesday 25 October 2017

Cozy winter mittens

The foils shows were a big hit and you can still buy the foils and transfers over on the Crafters Companion web shop but today I`m sharing with you another card which is featured in the Crafters Inspiration 16 magazine.

 
what was used:
sentiment stamps
12.5 x 12.5 off white base card
off white card
red, blue, dark blue and off white card scraps
blue & white bakers twine
watercolour paper scraps
black Versa Fine ink pad
Tim Holtz distress ink pad - vintage photo
4 x peg embellishments
12 x pearl gems
 
A really straight forward twisted easel card which looks more complicated than it is.
 
To make the twisted easel take the base card and fold the front of the card from bottom left corner to top right corner. This is the base for the card but you need a top section so cut a piece of off white card 12.5cm x 12.5cm which you will decorate and stick onto the base card.
 
Decorate the base of the easel card and attach a sentiment which is angled to create a stopper for the top part of the easel card.
 
...............................................................
 
I have no design work on for a while so I am hoping to get some Christmas cards made and I have a birthday card to make for someone who truly loves Christmas so it will be a Christmas card that says Happy Birthday - my friend will love it. Its such a lovely day today I wish I were at home to do a bit of tidying up in the garden but I`m in the cat shop this afternoon so I wont get the time for gardening.


Tuesday 24 October 2017

Baby baby

I`m showing you a sweet little trinket box today and it is really the easiest thing to make although it looks like something you might pay a lot for in a posh shop. It featured a lot on the Crafters Companion foils launch yesterday and it is really the foiling that gives it that professional finish.

 
what was used:
Crafters Companion, Bundle of Joy transfers
Crafters Companion, Blue Lagoon & Pear Green foils
Small wooden box from The Works (cost £1)
Dulux apple white paint
Tim Holtz mowed lawn distress ink
fine sand paper
 
Such a simple project, you will love the results
 
Rub the outside of the box with fine sand paper to make it smooth .
 
Paint the box with the apple white paint.
 
Rub the edges of  the box with the mowed lawn distress ink.
 
Add the transfers one at a time and foil immediately with both colours of foil (to use both colours of foil on one transfer simply cut out small pieces of foil and place onto the transfer, overlap the foils where they meet).
 
You can seal the box with a spray varnish is you wish.
 
 
A hand made gift like this for a new baby would be treasured and you could always put a little gift or some money in it to make it even more special.
 
.............................................................................
 
I had a fabulous day yesterday just crafting and chatting with my sister and she made a lovely card for her friend so it was very productive too. The weather here today is wet and windy so I will be staying home and locking myself in my craft room. Stu lit the fire yesterday dinner time and I loved how cozey it made the whole house feel for the rest of the day (Stu has made it his job to be in charge of the fires and he does do a good job with them). I love pottering about in the garden in summer but I do like the smell of a real fire when the weather turns cold.


Monday 23 October 2017

A splash of colour lifts the spirits

Crafters Companion are launching their foils and transfers for birthday week tonight at 6pm on Hochanda and I was lucky enough to have made samples for the show. The brief was to make matching sets of things and use as many different surfaces as possible so I decided tohave a go at foiling onto fabric and this card is the result.


what was used:
Crafters Companion, Fresh Journey foil transfers
13cm x 22cm cream base card
cream cotton fabric
cream linen card
thick card to back fabric
water brush
gold ink pad
4 x 2mm gold gems
 
The painting of this card took me all day to do but it is a real stress buster and thoroughly enjoyable.
 
Cut a piece of thick card to the size of the transfer and spray with stick & spray. Cut a piece of cotton larger than the card and stick onto the card. Take the backing from the transfer and place the transfer on the fabric, run the fabric/card/transfer combo through a Gemini machine. Peel off the acetate transfer sheet and place the foil over the sticky transfer. Cover the foil with copy paper and run through the Gemini machine. Remove the foil to reveal the pattern.
 
Colour in the pattern on the fabric with Spectrum Aqua pens (I used a piece of copy paper to lay over the foiled area that I would rest my hand on so as to not drag off any of the gold. Also build up slowly the layers of colours, remember that if you use too much water the colour will bleed and if you don't let the fabric dry before you apply the next layer of colour it will become muddy). When you have coloured as much of the pattern as you need allow the fabric to completely dry.
 
Gently peel away any excess fabric and cut down the backing card before cutting down and securing the fabric to the card from behind.
 
Foil the sentiment onto a piece of cream card using the Gemini as before and cut to size. Rub the edges of the sentiment banner with gold ink.
 
Mat and layer the card and attach the gold gems.
 
 
The foil is surprisingly robust once it is on the fabric but I tried to be as careful as possible when handling it and never to rub it.
 
 
This is a gift box that I made using the acetate transfer sheet and the Fucshia foil (Its how its spelt on the packaging). I love it when you can use the throw away bits to make lovely projects, its like a bonus gift.
 
 
I love working with foils and the amazing results you can get using them - things just look so lush. I have seen the samples that my teamies have made for this show and I would recommend that you watch just to get some ideas of what interesting ways that any foils can be used.
 
..........................................................
 
I was out shopping on Saturday with my friend and found the most amazing sewing shop not too far from where I live. I was like a child in a sweet shop and although I was really good and mostly bought ribbons I did pick up what I thought was glitter paper only to find it is glitter felt, I cant wait to use it.
My sister is calling this afternoon to have a crafty time as she needs to make some Christmas cards and also find her MoJo, but mostly its just a great way to spend an autumn afternoon.


Saturday 21 October 2017

A Crafters Inspiration card

This is a card that I have made for Crafters Inspiration 16 magazine which is on sale now. I had been asked to make cards which featured bakers twine and when I got the brief I was less than thrilled, I mean bakers twine. I ordered lots of bakers twine in many thicknesses and colours and I have to say the results were much better than I expected.

 
what was used:
2x snowflake dies (1 larger than the other)
snowflake stamp
merry Christmas sentiment stamp
gold embossing powder
cream linen base card 8.5cm x 21.5cm
cream linen card scrap
black Versa Fine ink pad
Versa Mark ink pad
Tim Holtz distress inks - faded jeans, Peacock feathers, evergreen bough, twisted citron
1cm blue faceted gem
thick beige & white bakers twine
water mister
 
 
This is a card packed with techniques so perhaps not for the beginner
 
Stamp the evergreen bough, faded jeans and Peacock feathers distress inks fairly close together onto a craft mat and mist with water until beads of water can be seen. Take a piece of Sheena stamping card bigger than the finished panel to be used and roll it once onto the inks, dry the paper and repeat the process until you have the desired look.
When the card is dry cut it down to size and rub over any light or whit patches with twisted citron distress ink.
 
Using a Versa Mark ink pad randomly stamp snowflakes on the coloured panel, cover with gold embossing powder and heat emboss.
 
Attach two pieces of bakers twine to the side of the panel. Mat and layer the panel onto the gold mirri card, then onto black card and finally onto the base card.
 
Stamp the sentiment onto a scrap of cream linen card using Versa Fine ink and cut this out to form a tag.
 
Cut 2 snowflakes from the mirri card (one larger than the other) and glue them together. Glue the tag on to the card, glue the snowflakes to the tag and finally glue the gem onto the snowflakes.
 
 
I used a hot glue gun to attach the tag, snowflakes and gem as this sets quickly and forms a coating over the bakers twine which the embellishments can attach to.
 
I am still waiting for my Crafters Inspiration to arrive and I cant wait to get my hands on the CD and look at the fabulous Christmas backing papers which are on it. I know there is a lovely Christmas embossing folder and snowflake edge die too so I think I might be making some Christmas cards whilst I`m off work this next week.
 
..........................................................................
 
I am going on a shopping trip with a good friend today and although she is not a crafter she is very good and puts up with me dragging her into any shop that looks remotely crafty and then getting over excited over a crayon or pencil.  She is the same when we visit a garden centre and see plants.
I think storm Brian is due to descend today so that will bring even more leaves off our trees and Stu will be having more bonfires. I hope you all keep safe and don't get blown away.


Friday 20 October 2017

Little bah lambs

Well the bags of inspiration on Hochanda last night were a big success and I`m no surprised at the price they were asking for all those goodies. Here is a simple little card which caught Yannis the presenters attention and then Sara only went and mentioned my name on air. Famous for about 2 seconds.

 
what was used:
Crafters Companion, Little Angel, Drifting Clouds dies
Crafters Companion, Sheena Stamping Card
Woodware, Fluffy Stuff
Tim Holts distress inks - mowed lawn, twisted citron, peeled paint, shabby shutters, tumbled glass
black card
blue card
heat gun
 
A simple naive looking card which is very easy to make.
 
Cut the two main cloud shapes out to make the sheep, cover with fluffy stuff and heat with the heat gun (This can be  bit tricky as the fluffy stuff needs to be heated for quite a long time before it fluffs up so I attached a cocktail stick to the back of the cloud to enable me to hold it without burning my hands. Do not hold the heat gun too close for too long on the fluffy stuff or it will scorch).
 
Cut the rest of the clouds that you will need.
 
Using the shape left behind from the cut out clouds as a mask colour in the background with the distress inks (I only used the masks on the grass area as I wanted the sky to look flat).
 
Using black card cut the legs and heads for the sheep and attach them to the bodies with tape.
 
Stick the sheep onto the background and cut the background to the required size.
 
Stick the clouds onto the background and then cut off any overhang.
 
Simply mat and layer the rest of the card.
 
I was only allowed to use the products which were in the bag so in an ideal world (and if I were making this for myself) I would have added a sentiment and perhaps a few flowers but here you have the basic idea and you can truly make this card your own.
I would love to see your version of this if you make it, so please don't be afraid to leave a photo in the comments if it allows you to do that.
 
...........................................................


Thursday 19 October 2017

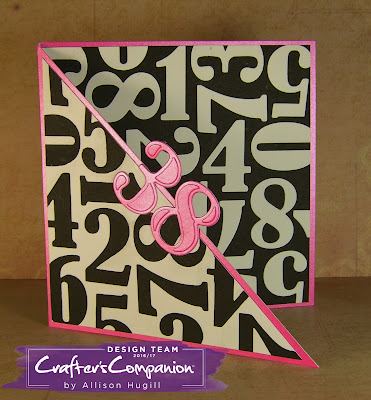
A birthday card for BIRTHDAY WEEK

Hello again, I will be posting quite a few blogs from now on as the Crafters Companion birthday week begins today at 6pm with the one day special and then this card will be on the 7pm show which is called bags of inspiration.

 
what was used:
Crafters Companion, Birthday Party, Fun With Numbers dies
Crafters Companion, Centura Pearl, Trends card
Crafters Companion, Sheena Stamping Card
Crafters Companion, Stick & Stay spray glue
14.5cm x 14.5cm base card
black card
 
Quite a time consuming card to make as you have a lot of die cutting to do but not difficult to make.
 
Cut the front of the base card from corner to corner to make a triangle.
 
Cover the base card with pink Centura Pearl card.
 
Make a white mat for the front of the card and a black mat for the inside of the card (the inside mat must go to the edge of the fold - no mat on that edge).
 
Die cut the black numbers and arrange them on the white triangle mat, don't worry about numbers overhanging the mat as they can be trimmed later. When you are happy with your layout remove each number individually, spray on the reverse with Stick & Spray, stick the number into position. Repeat the process for all the numbers. Cut the overhanging numbers down. Stick the mat onto the front of the card.
 
Cut a piece of black card to mat and layer on the inside of the base card (remember to butt the black card to the centre fold of the base card - no mat on this side). Die cut the numbers from white card and repeat the process used for the front of the card.
 
Die cut the numbers you require from pink Centura Pearl and using Collall tacky glue and a little Collall 3D glue stick the numbers into place.
 
 
This is just one of the dies in one of the bags of inspiration and the bag contains many more things, definitely a good buy.
 
..........................................................................
 
Yesterday I was volunteering in the cat shop and it was a very busy day which is good because that's money being made to feed the cats at the shelter. When my sister moved house a couple of weeks ago one of her cats escaped from the new house and has never been seen since. Of course my sister is heartbroken and racked with guilt and I just hope that someone finds Laddo and brings him to the shelter.
 I called into the Post Office whilst I was out and about yesterday and a long queue had formed because a man was wanting to cash in £130 worth of old pound coins. The cons were taken out of circulation on Sunday so the Post Office couldn't change them and the man was quite angry and frankly I don't think he believed the woman serving at the counter. I was reading that the Poppy Appeal will accept the old pound coins as payment for the Poppies so if you have any it would be a good way to use them up and for a good cause too, of course £130 worth would buy a lot of Poppies.


Wednesday 18 October 2017

The sunset was this colour lastnight


Hello crafty friends, today I am showing you a sample card that I have made for Little Claire using one of their new dinkie stamps which they launched a couple of weeks ago. When I made this card it was still summer but now that the weather has turned and the nights are drawing in I can look at this and see that it captures the warmth of Africa whilst still having quite gentle colours.


what was used:
Crealies CLDRXL circles die
Butterfly punch
8" x 8" white base card
black & cream card
printed vellum
pink glitter card scraps
5mm black satin ribbon/bow
black Nuvo drops
Tim Holtz distress ink - mustard seed
black Versa Fine ink pad
4 x black brads
 
A very easy card to make. I simply coloured the bottom of the pink and yellow ombre paper with the mustard seed distress ink to make the colour more intense and then stamped the image and the sentiment over the top.
 
I worked from the centre out with the mat and layering and finally cut the 8" x 8" base card down to the required size.
 
I was lucky enough to have this beautiful vellum in my stash and that is why I used it but you could print out your own by using printable vellum or you could do away with the vellum all together and just use a nice vintage backing paper.
 
Use the brads to attach the vellum because any thing else will show through the vellum
 
 
I have been doing lots of samples for the Crafters Companion birthday week which begins tomorrow and that is why I have sadly not had time to blog - SORRY. I have done samples for the "bags of inspiration" shows and later on in the event you will see "foils and transfers" which I also made samples for. Crafters Inspiration 16 is due in the shops any day now and I have a double page spread in that featuring samples made with bakers twine. I have to give you a heads up on the foil and transfers and say that they are just amazing to work with and create the most special cards. The foils show will go out on Monday 23rd October so keep your eyes peeled here on my blog and on Hochanda. Of course I will be sharing with you the samples when they are due on TV.
...........................................
 
After all the strong winds of the last few days the leaves on our big Sycamore tree are starting to fall and Stu and me had a fun time last night, me raking them up and him burning them. I love the smell of fallen leaves and it brought back memories of running through them as a child. My sister has made a leap of faith and moved from Yorkshire to a village near me so I am thrilled to have my play mate back and we went on a shopping trip yesterday just like we used to before I moved to Lincolnshire. My niece is having her big 40th birthday at the end of October and I have to crack on and make her a card but I don't know weather to go for a foil card or a cutsie card like I usually make her. The foils are so gorgeous and definitely for a special birthday so I am leaning towards them at the moment, I will of course share it with you when its finished.
 
Do you remember in the summer that I painted and updated an old blanket box? Well this is the box now that its finished and at the foot of the bed. I love the stencil which I got from Ebay. The trouble with stencils is that they are addictive and I had to stop myself from doing more. The two teddies on the box are leftovers from when I used to have a craft stall and I made these teddies to sell (a long time ago now), they look a bit drunk leaning over like they are. I loved how the box turned out and it just looks right in my little cottage.