Friday, 13 November 2015

Dandelion Friend Card


This is what I was doing at the beginning of the week when the wind was howling down the chimney and blowing all the leaves off of the trees, and it`s made using the new Little Claire dinkie Dandelion stamp. I like my character stamps but sometimes it is really nice to use a simple stamp to get a stylish/classy result. Its easy to do and once you've had a go at this technique you will want to use it over and over again so have a go......

what you will need:
black Versa Fine ink pad
Tim Holtz Vintage Photo Distress Ink
white base card 15cm x 23cm
copy paper
white card
black paper
craft card
page from an old book
small hole punch
medium hole punch
string
Black fine tip pen
flower die 3.5cm across
flower die 2,5cm across
die cutting machine
black brad

Cut the base card down to 12.2cm x 17.5cm.
Mat and layer the craft card onto the base card.

Using the black Versa Fine ink pad stamp the Little Claire dinkies Dandelion image onto white card at least 1.5cm from the side of the card and 2cm down from the top of the card.
Tear 4 wide strips from the copy paper.
Stick the strips together with tape to make a frame for the stamped image but make the frame longer than the stamped image because you are going to lengthen the stems of the Dandelions.
Using low tack tape secure the frame over the stamped image.
Shade the edges of the image using Tim Holtz Vintage Photo Distress Ink (Use Cut n Dry foam and dab the foam into the ink and then onto some scrap paper to remove excess colour, using a small circular motion begin to work from the edge of the frame into the middle of the image and always work away from the frame so as to not tare or fold back the edges of the frame).
Carefully remove the frame.
Lengthen the Dandelion stems using the black fine tip pen.
Cut the card to 10.5cm x 16cm.
Cut 3 pieces of string long enough to wrap around the bottom of the image card and tie a knot where you want the flower embellishment to sit.
Wrap the string around the image card at the bottom making sure that the knot sits where you want to place the flower embellishment, fan out the strings to the left of the knot and secure around the back of the card with tape, cut off any extra string.
Secure the right hand strings around the back of the card with tape and cut off any excess string.
Mat and layer the white image card onto black card.

Using the old book page and the two flower dies cut out the flowers.
Shade the edges of the flowers with Tim Holtz Vintage Photo Distress Ink.
Shape the flower pieces and lay the smaller flower on top of the lager flower, make a hole at the centre of the flowers with the small hole punch.
Make a hole on the white image card where the knot is.
Place the black brad through the holes on the flower die cuts and through the
white image card and spread the legs of the brad at the back of the black card.
Stick the image topper onto the base card.

Using the black Versa Fine ink pad stamp the Little Clare dinkie text "You`re a lovely friend" onto white card
Cut the sentiment out.
Shade the edges of the sentiment wit Tim Holtz Vintage Photo Distress Ink.
Cut 2 small circles from the black card using the small hole punch.
Stick the black circles onto the sentiment banner.
Stick the sentiment banner onto the base card.

Cut 6 circles from the black card using the middle size hole punch.
Stick the black circles onto the base card.


Tuesday, 10 November 2015

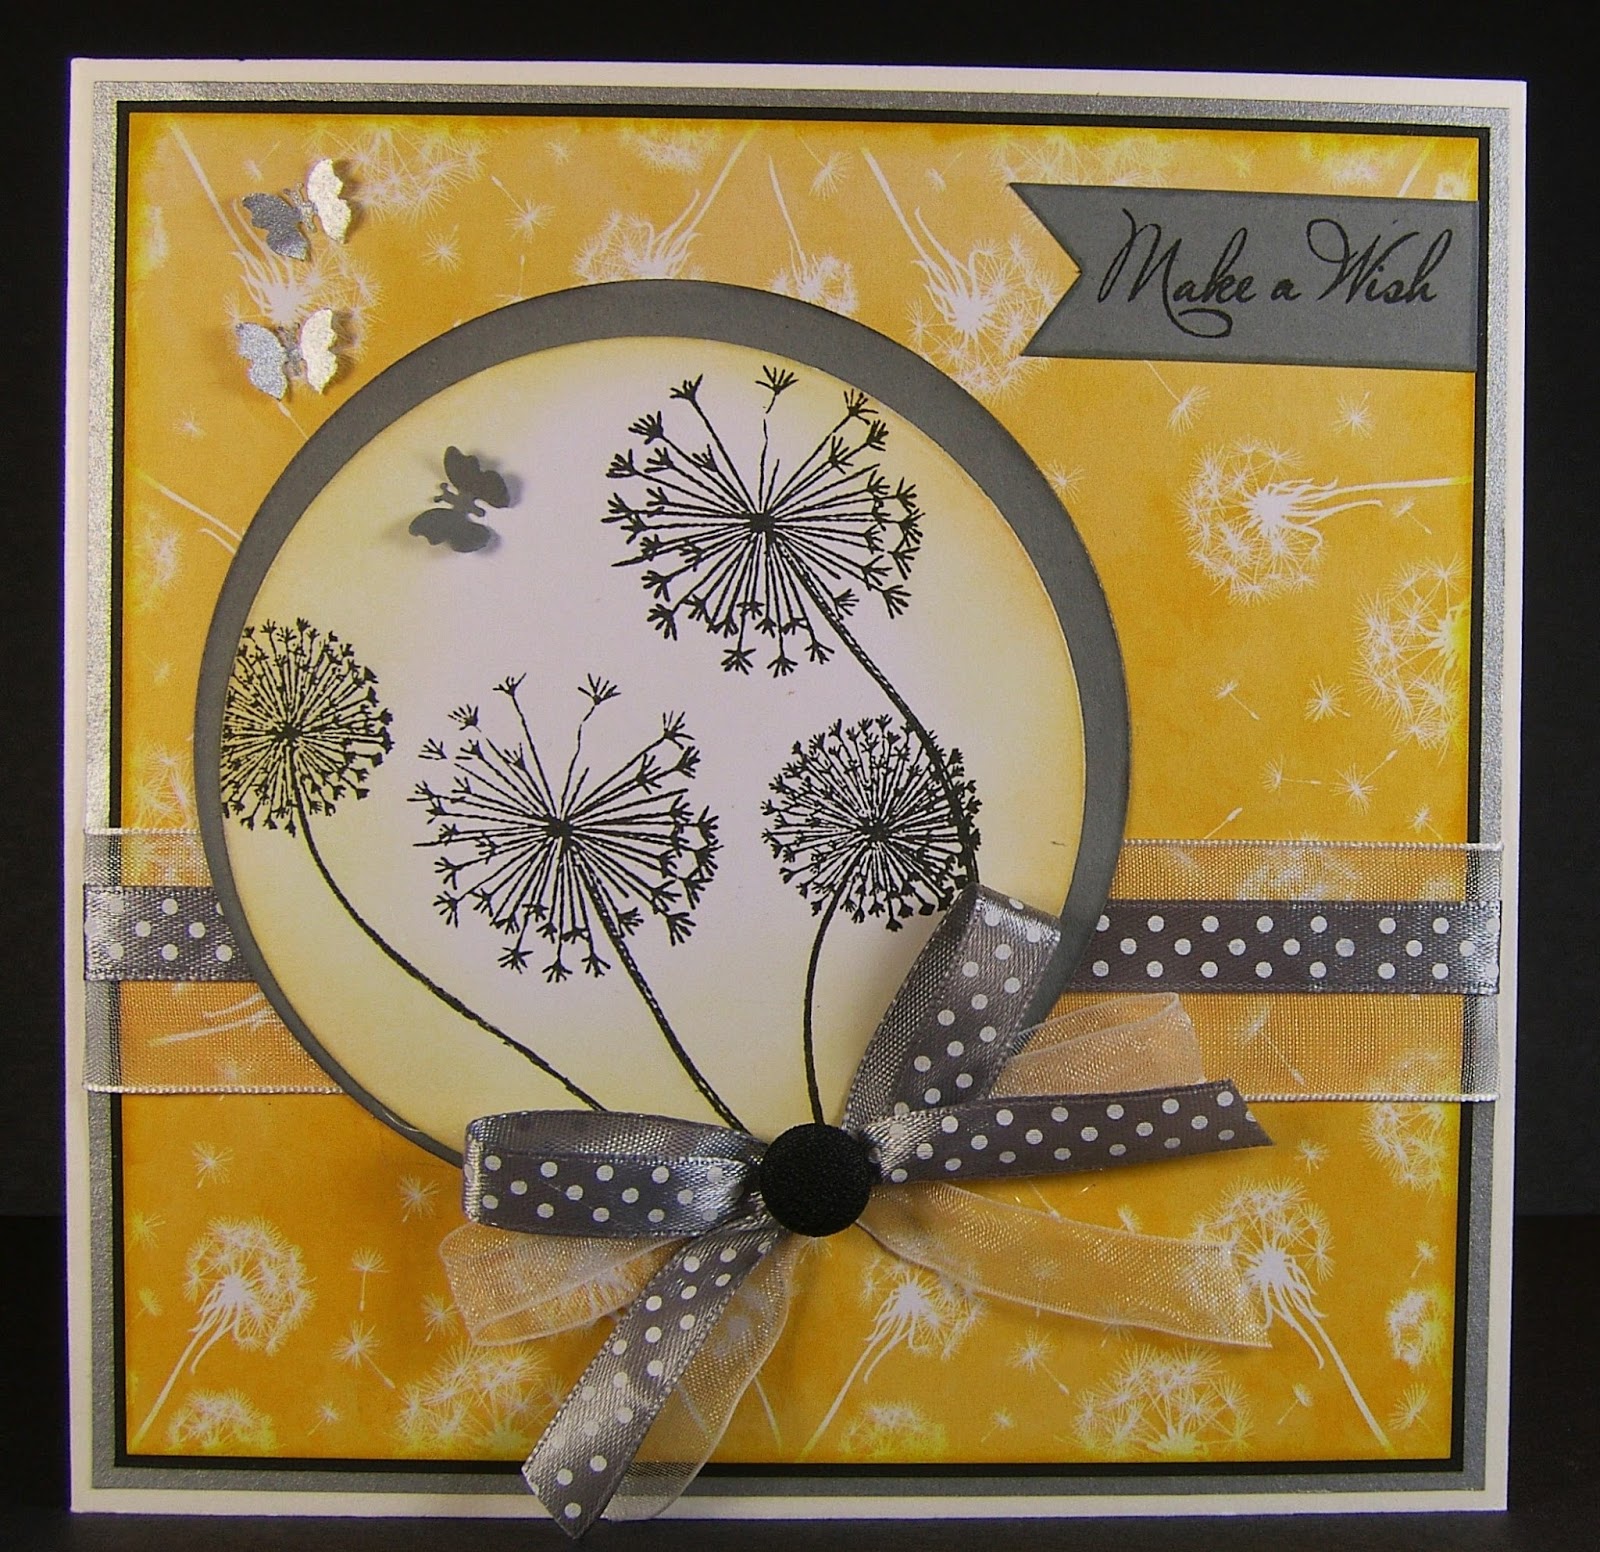
Make a Wish Card


what you will need:
Little Claire Floating Dandelions Paper Stack - yellow
Inkylicious Make a Wish stamps
6" x 6" base card
black Versa Fine ink pad
Tim Holtz Mustard Seed Distress Ink
Cut n Dry foam
yellow pastel chalks
grey satin/pearl paper
black paper
darker grey paper
Tattered Lace Essentials Circles dies - No 11 & 12
die cutting machine
Tonic small butterfly boot punch
1/4" wide grey and white spotted satin ribbon
1" wide white organza ribbon
1/4" wide white organza ribbon
black button embellishment

Using the Tim Holtz Mustard Seed Distress Ink and the Cut n Dry foam shade the edges of the Little Claire Floating Dandelions paper stack.
Mat and layer the yellow dandelions paper onto black paper.
Mat and layer the black paper and dandelions paper combo onto grey satin paper.
Make sure that the yellow dandelions paper is shaded darker at the bottom, cut a piece of the white 1" organza ribbon and secure it to the mat and layered papers about 2 3/4" from the bottom of the papers to the top of the ribbon (remember to wrap the ribbon behind the papers and secure with tape).
Cut a piece of the 1/4" grey and white potted satin ribbon and secure this to the card about 2 1/2" from the bottom of the mat and layered papers to the top of the ribbon, secure the ribbon around the back of the papers as before.
Stick the papers/ribbon combo onto the base card.

Cut out a circle from the white card using the Tattered Lace Essentials Circles die No 11.
Stamp the Inkylicious Make a Wish images within the circle (remember that you can bend the stems of the dandelion clocks into a suitable position when placing the stamp onto the acrylic block).
Shade the edges of the circle with yellow pastel chalks.
Using the Tattered Lace Essentials Circles die No 12 and the darker grey paper cut out the circle.
Stick the stamped image circle onto the darker grey circle (remember to off set the white circle so that more of the grey circle is showing at the top).
Stick the circle toppers onto the card.

Make a bow from the 1/4" white organza ribbon and stick it onto the card.
Make a bow from the 1/4" grey and white spotted satin ribbon and stick it on top of the organza bow.
Stick the black button to the middle of the bows.

Stamp the sentiment using the black Versa Fine ink pad and the Make a Wish stamp onto the darker grey paper.
Cut the sentiment out making a ribbon tail shape at the beginning of the words.
Stick the sentiment onto the card.

Using the Tonic small butterfly boot punch make 1 butterfly from the darker grey paper and 2 butterflies from the grey satin/pearl paper.
Bend the butterflies wings back along the butterflies bod.
Stick the darker butterfly to the card within the topper circle and the other two butterflies to the top left of the card.


Wednesday, 4 November 2015

Cupcake Tree Picture


Little Claire are launching their November digi stamp challenge and the theme is "anything but a card" and this is a little picture that I have made as part of the design team. It is such a sweet digi stamp and it was really fun to make. I hope you are inspired to have a go for yourself and enter the competition and if you do you could win this lovely prize.............


FIVE DIGI STAMPS OF YOUR CHOICE


what you will need:
printer
Serif Craft Artist graphics program or a similar graphics program
your choice of background
Hobbycraft 5 3/4" x 5 3/4" stretched canvas
120gsm white linen print paper
white copy paper
good quality mat print paper
Tim Holtz Distress Ink - Tumbled Glass, Mustard Seed, Dusty Conchord, Shabby Shutters
Cut n Dry foam
black fine tip pen
pink faceted gems
Liquid Pearls - White Opal
mauve coloured ink pad
black Versa Fine ink pad
pale green colouring in pen
 
I use Serif Craft Artist as my graphics program and I will take you step-by-step through the process of creating the image but if you do not have this graphics program don't worry, your program will do the same things but unfortunately I can not walk you through the process.
 
On your computer open up the Serif Craft Artist graphics program.
From the start up wizard double click on the "blank project" at the left hand side of the screen.
A  page set up will appear, in the "regular" box at the top of the page double click on the "A4 portrait".
The Digi kit browser box will now appear so click on "done" at the bottom of the page.
Now you have a blank A4 work area to place your design onto.
My Craft Artist always has cm as default ruler guides and we need to change this to inches so at the top left of your screen you will see a point where two rule bars meet, hover the cursor over this point until it changes from an arrow to a hand and then right click, select inches from the drop down box that will appear.
Hover your cursor over the left hand ruler and left click and drag at the same time to create a guide line. Drag the guide line to the 5 1/4" measure on the top ruler. Repeat this action with the top ruler dragging the guide line down to 5 1/4" on the side ruler.
You now have guide lines on your work area. These guide lines can be moved or removed at any time and will not print onto the finished work.
You need to have a file on your computer which contains your background image and this can be a file from a image CD or it could be one you have purchased from the Serif Daisytrail online shop or you could do as I did and make your own background and scan it to create a PDF  file (I made this image using alcohol inks and acetate).
Click on the insert tab at the top of the screen, select photo from the drop down box, select from file from the drop down box, a window will open containing the files on your computer, simply select the file/image you wish to use in your project and click on open at the bottom of the box.
You will now be back at your work sheet and your cursor will have turned into a white cross, left click and drag the cursor diagonally and your image will appear in the box you are creating.
Your image will appear within a blue box with cross hares at the top left corner, left click on the cross hares and drag the image to the top left of your work space.
You will see white boxes at intervals along the edge of your image (these are re sizing points), hover your cursor over the bottom right square until the cursor becomes a double ended arrow, left click and drag the square until the image is the same size as your guide lines (if your image is not a square shape simply repeat the re sizing process with the white squares along the edge of the image until it is the required size). 
The background image will have a grey box at the top left corner, left click on the box and drag the background image to the centre of the work sheet (you can also left click any where on the image and drag it).
Move the guide lines to the edges of the background image by hovering the cursor over the guide line until the cursor turns into a double ended arrow, left click  and drag the guide line into place.
Click on the edit tab at the top of the toolbar, select copy from the drop down box, *click on edit from the tool bar, click paste from the drop down box. You have now duplicated the background image but you can not see it because it is on top of the original image.
Left click on the image and drag to butt up to the side of the original image with no white showing in between* (if the edges of the image look odd or don't line up you can flip the copied image and this may look better - click on the arrange tab in the tool bar, click on the flip vertical or flip horizontal button from the drop down box).
Repeat from * to * another three times and arrange the copies around the original image to form a + shape.
 
You will have downloaded the Little Claire Cupcake Tree digi stamp when you bought it and it will probably be in your download folder, I would recommend that you create a new folder for your digi stamps and put the Cupcake Tree in this folder and any other digi stamps that you may have.
Click on the insert tab on the tool bar, click on photo in the drop down box, click on from file in the drop down box, you will now have a file location box open and you must find the Cupcake Tree file and click on it (it will change colour), click the open tab at the bottom of the box.
As before with the background image you will be taken back to the work sheet  and the cursor will appear as a white cross, left click and drag diagonally to make the image appear.
Re size the Cupcake tree image to 5 1/2" from the top of the tree to the bottom of the tree (you may wish to use guide lines to help with this).
Move the Cupcake Tree image to where it needs to be on the canvas (I made my little bird on the branch wrap around the side of the canvas so if you want to do this make sure that the bird on the branch is outside of the right hand guide line).
You now need to make the Cupcake Tree image partially transparent so that you can see the background image through it and this is done by left clicking on the Transparency slider bar at the right hand side of the screen, slide the bar till it reads 53%.
 
Now you need to make the sun so using guide lines make a box 2" square any where on the work space.
Click on the arrow at the side of the shapes tab on the tool bar, select the circle shape from the drop down box, black cross cursor to the top left of the guide line box that you have just made, left click and drag until you have filled the box with a circle.
Whilst the circle is selected click on the yellow colour from the squares at the right hand side of the screen, amend the colour by clicking within the triangle in the colour wheel at the right hand side of the screen.
Click on the format tab in the tool bar, click on filter effects from the drop down box, click on feather in the filter effects box and move the Blur slider until it reads 8.25%.
Move the sun to behind the Cupcake Tree image.
If you want to save this work I suggest that you do it at this stage.
 
Select the Cupcake Tree image by clicking on it and make it totally transparent by moving the transparency slider to 100%.
You are now going to print the background image so load your printer with the 120gsm white linen print paper.
Click on the file tab at the top of the task bar, click on print from the drop down box, (you should see the name of your printer in the printer box) click on the properties tab, in the properties box select photo and click on the OK button at the bottom of the box, click on print at the bottom of the box.
When your print comes out of the printer re load it back into the printer exactly as it was loaded before (this is really important because you are going to over print onto the same piece of paper and if it is not in the right place it will not look right).
Your Cupcake Tree image should still be selected even though you can not see it and now you must return the transparency slider bar to 0% so that you can see the image.
One by one select the background images and delete them by pressing the delete button on the keyboard.
Print the Cupcake Tree image onto the already printed background.
 
Load the printer with copy paper and print the Cupcake Tree image.
 
You are going to print the recipe wording so delete the Cupcake Tree image and the sun image behind it.
**Click on the text tool tab in the tool bar, bring the cursor down onto the work sheet and begin typing the word** Recipe, move the cursor over the word and right click, select text from the drop down box, select character from the drop down box, click on the arrow at the side of the font box and select Vive, type 52.88pt in the size box, click the OK box at the bottom.
Repeat from ** to ** and type the words for a purrfect day.
Move the cursor over the text and right click, select text from the drop down box, select character from the drop down box, click the arrow at the side of the font box and select Studio, type 27.53pt in the size box, click the OK box at the bottom. 
Move the two texts until they are suitably arranged.
On another part of the work sheet write the words
1 x worries away cat,
1 x cupcake tree,
add time to enjoy,
sprinkle with sunshine
Select the words and as before select Troutkings BTN in the font box and type 32.54pt in the size box.
Print the text onto good quality mat print paper.
 
THAT IS THE SCARY STUFF OVER WITH (NOT SO SCARY REALLY) NOW FOR SOME CRAFTING
 
Remove the canvas from the Hobbycraft 5 3/4" x 5 3/4" frame.
 
Cut out the printed paper to fit the frame but remember to leave tabs on 4 of the edges (as you would do when making a box).
Roughly hold the cut out printed image over the wooden frame and cut one of the sides which has tabs on so that it wraps around the side of the frame and onto the back of the frame. 
Mark the paper where it will need to be cut and with scissors cut to size.
Apply wet glue to the edge of the paper where it will stick to the wooden frame and hold in place till the glue sticks.
Glue the tabs in place and repeat for the opposite side.
Cut away the excess paper and glue the two remaining sides in place.
 
Using the Tim Holtz Distress Inks Dusty Conchord, Picked Raspberry and the Cut n Dry foam shade the edges of the canvas.
Using the mauve coloured ink pad stamp your swirly stamp image around the left hand side of the canvas (be careful not to press on too hard as the canvas is hollow at the centre).
 
Take the image of the Cupcake Tree which you printed out earlier onto copy paper and cut out the cupcakes and stick onto the canvas image.
Colour the bun cases with a pale green pen.
Add the White Opal Liquid Pearls to the top of the cupcake images to represent icing and allow to dry (you may need to repeat this process three or four times to give the required height).
Add a small faceted pink gem to the top of each cupcake.
 
Cut out the recipe text which you printed earlier.
Using the Tim Holtz Distress Inks Tumbled Glass and Shabby Shutters shade the words.
Define the edges of the word blocks by rubbing a black ink pad around them.
Stick the words onto the canvas to form the recipe.
 
If you wish to hang the canvas from something you must apply a ribbon or some other form of hanging to the canvas.


Tuesday, 27 October 2015

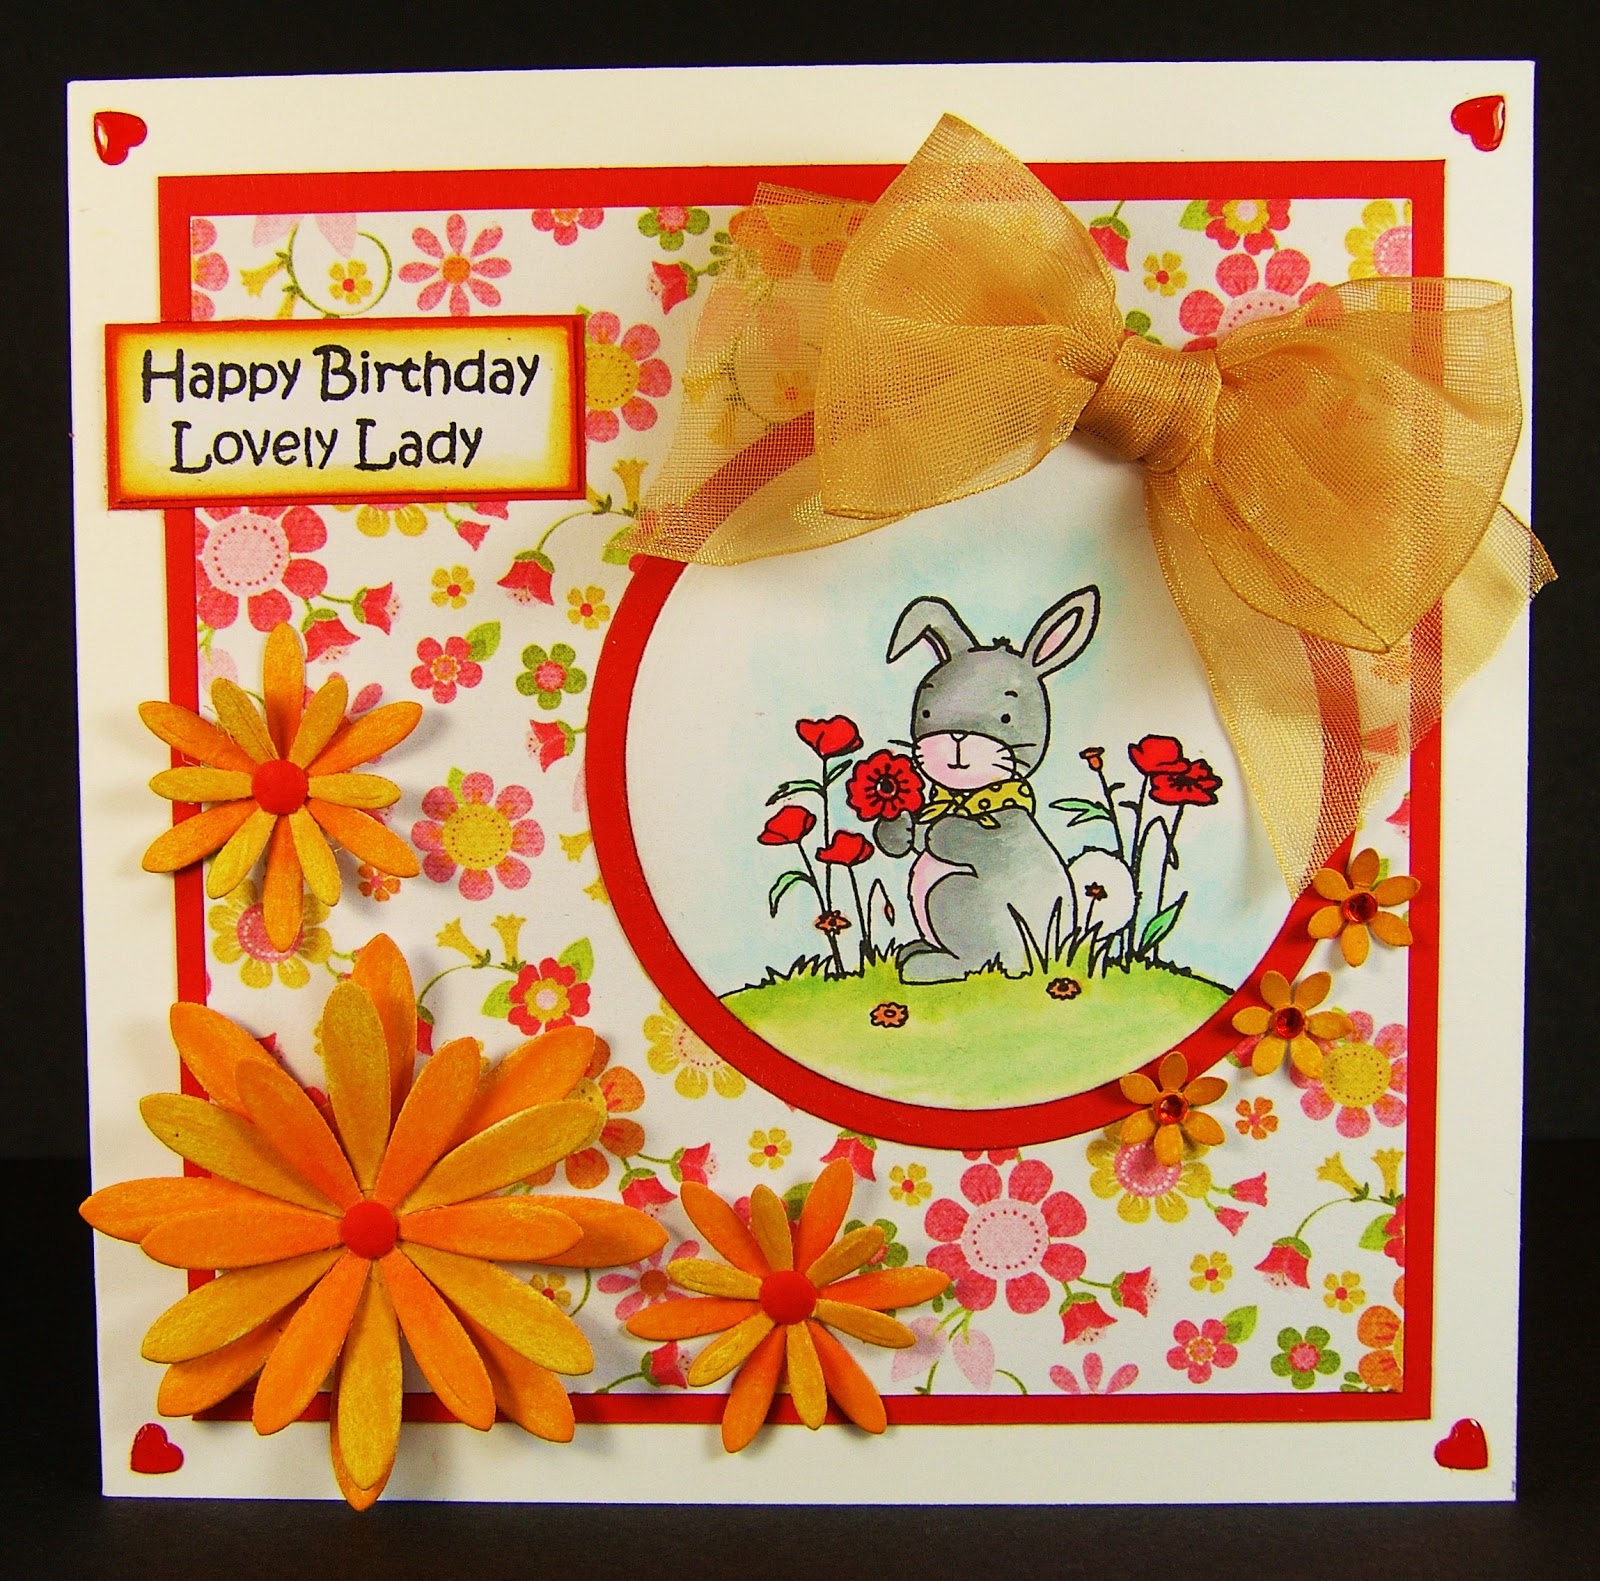
Bunny Birthday Card


Issue 2 of the Little Claire magazine has been published and if you buy it for £5.50 you will get a cute little bunnie stamp, some fantastic background papers and some great tutorials. This is a card I have made using the stamp and I have to say it was a delight to work with such a lovely image.
 
 
what you will need:
Little Claire magazine issue 2 free Bunny Stamp
5 1/2" x 5 1/2" base card
Nit Wit Collections, One Birdie Lane paper pad - white flowery
white card to stamp onto
black Versa Fine ink pad
red paper
Creative Expressions Delicate Daisies Complete Petals dies
Tattered Lace Essentials Circles dies No. 8 & 9
die cutting machine
Tim Holtz Distress Ink Pads - Wild Honey, Spiced Marmalade
Cut n Dry Foam
colouring in implements
Tonic small flower boot punch
small heart punch
ring binder punch
Glossy Accents
faceted red gems x 3
golden beige organza ribbon 1 1/2" wide

Cut the red paper to around 4 3/4" and stick onto the centre of the base card.
Cut the One Birdie Lane paper to mat and layer onto the red paper and stick into place.
Punch 4 small hearts from the red paper and stick into place at each corner of the base card.
over the hearts with Glossy Accents and leave to dry.

Cut a circle of red paper using the Tattered Lace Essentials Circles die No 9.
Using the Little Claire Bunny Stamp and the black Versa Fine ink pad stamp the image onto white card.
Using the Tattered Lace Essentials Circles die No. 8 cut out the stamped image.
Colour in the image and mat and layer onto the previously cut red paper circle.
Stick the Bunny topper onto the base card.

Using the sentiment "Happy Birthday Lovely Lady" from the Bunny stamp and the black Versa Fine ink pad stamp the sentiment onto white card.
Trim the sentiment to size.
Using the Tim Holtz Wild Honey Distress Ink and the Cut n Dry foam shade the edges of the sentiment.
Mat and layer the sentiment onto red paper.
Stick the sentiment onto the base card.

Using the Creative Expressions dies cut out the daisies from white card (the smaller daisies have two layers and let lager Dasey has three layers).
Using the Tim Holtz Distress Inks Spiced Marmalade and Wild Honey and the Cut n Dry foam apply colour to each layered section of the daisies (I alternated the colours using one colour for one layer and the other colour for the next layer).
Stick the flowers together.
Stick the flowers onto the base card.
Using the ring binder punch cut out 3 circles from the red paper.
Bevel the punched circles.
Stick one circle at the centre of each flower.

Using the Tonic small flower boot punch cut out 3 flowers from the white card and colour each flower using the Tim Holtz Wild Honey Distress Ink and Cut n Dry foam.
Stick the flowers into place around the edge of the topper.
Stick a red faceted gem in the centre of each flower.

Make a bow from the golden beige organza ribbon.
Stick the bow to the base card.


Tuesday, 20 October 2015

Tree O of Birds dinkie stamps Card


Little Claire have a new set of dinkie stamps out and they are so sweet and understated. This is a card I have made using the new stamps ...... just lovely to work with.

what you will need:
Little Claire dinkie Tree O of Birds clear stamp set
Little Claire Dinki Text Stamp Happy Birthday Mrs Lovely
Little Claire Dinkie Text tamp To Loveley You
Prima Marketing Doodle Deux 6" x 6" paper pad - blue leaves & flowers
Magnolia Doo Hickey hearts border die
die cutting machine
5 7/8" cream base card
cream card to stamp onto
colouring in implements of your choice
red card
brown Memento ink pad
Tim Holts Distress Ink - Vintage Photo
Glossy Accents
brown craft paper
1/8" red satin ribbon

Cut the red card to mat and layer onto the cream base card and stick into place.

Cut the Doodle Deux blue leaves paper to mat and layer onto the red card but do not stick into place.
Cut the brown craft paper to 2 3/8", stick onto the right hand side of the Doodle Deux paper and cut to size at the top and bottom.
Shade the top, bottom and right hand edge of the brown craft paper with the Tim Holts Vintage Photo Distress Ink using the Cut n Dry foam to apply the ink.
Using the brown craft card and the Doo Hickey hearts border die cut a border strip.
Straighten off the strip by cutting the plain side down.
Shade the heart side of the border using the Tim Holtz Vintage Photo Distress Ink and applying the colour with Cut n Dry foam.
Stick the straight side of the hearts border to the brown craft paper all ready stuck to the Doodle Deux paper and trim away the excess at the top and bottom of the border.
Using the Little Claire Tree O Stamps and the brown Memento ink pad stamp the image of the little bird with a heart on it.
Shade the stamped image with the Tim Holtz Vintage Photo Distress Ink and then colour the heart red.
Using the Little Claire Dinki Sentiment stamps "To Lovely You, 100% Awesome and You`re a Lovely Friend" and the brown Memento ink pad stamp the sentiments onto the brown craft paper.
Cut a piece of the red satin ribbon long enough to lay over the brown craft paper and leave enough to wrap over the top and bottom of the paper.
Cut a smaller piece of red satin ribbon and tie it to the longer piece of pre cut ribbon.
Lay the ribbon over the join between the two pieces of brown craft card, wrap around over the edge of the paper and secure at the back with tape.
Move the knotted piece of ribbon to where you would like it to be and secure in place with a drop of strong glue and allow to dry.
Trim the knotted ribbon to size.

Using the Little Claire Tree O Stamps and the brown Memento ink pad stamp the images onto cream card.
Colour the images using colouring in implements of your choice making sure that the heart on the bird/heart image is coloured in red.
Make the border around the images extra thick and cut the images squares out.
Stick the images onto the base card at a jaunty angle and make sure that the bird/heart image is at the bottom of the card.
Add Glossy Accents to the heart on the bottom of the card and allow to dry.


Saturday, 10 October 2015

Little Claire October Stamp Challenge - My Favourite Little Clire Stamp


Today Little Claire are launching their October Stamp Challenge and the theme is "Favourite Little Claire Stamp". I have to say that I do have stamps which I go back to time and again and I suppose they are favourites but I think that my favourite stamp is the last one I bought or the one I used on the last card I made. This is the card I made as part of the Little Claire design team and I got this lovely little stamp last week at the GNPE in Harrogate, I love the fact that it comes as 4 individual stamps.
If you have a favourite Little Claire stamp then why not make something gorgeous with it, send a photo of it into the competition and you could win these lovely goodies.......
 
£10.00 Voucher to spend on LC Website
 

what you will need:
black Versa Fine ink pad
Tim Holtz Distress Ink Pads - Wild Honey, Fired Brick, Ripe Persimmon
fancy square dies 3 1/2" & 4"
die cutting machine
6 " x 6" white base card
Do Crafts Garden Party paper pad
paper flower template from Pinterest
white card to stamp onto
orange paper
green paper
yellow paper scraps
colouring in implements of your choice
1 1/4" cream lace
1/4" yellow satin ribbon
Tonic small flower boot punch
small dragonfly punch
small hole punch

Cut a square from the white card using your fancy square 3 1/2" die (I have had my die many years and the packaging has long since gone so I do not know what make it is but I have seen that X Cut do a very similar die).
Stamp the Little Claire "Lets do Lunch"image onto the die cut square using the black Versa Fine ink pad (I used the flowers on the tree and the Tulips more than once to build the picture and fill in the space).
Colour the image in.
Cut a square from the green paper using the 4" die.
Mat and layer the image onto the green paper.

Cut the orange paper to mat and layer onto the 6" x 6" base card but do not stick it down.
Cut the green paper with small daisies from the Do Crafts Garden Party paper pad to mat and layer onto the orange paper and stick onto the orange paper.
Using the Garden Party paper which is white with large flowers on it cut to 11.5cm x 11.5cm.
Mat and layer the paper onto the orange paper.
Stick the papers at a jaunty angle onto the green daisy paper.
Cut the 1 1/4" cream lace ribbon so that it is long enough to secure around the back of the papers.
Cut the 1/4"yellow satin ribbon to the same length as the lace ribbon.
Stick the lace to the card about 2" up from the bottom of the papers at its middle and wrap the ends of the lace around the back of the papers and secure with tape.
Place the yellow satin ribbon over the lace and secure the ends of the ribbon around the back of the papers.
Mat and layer the topper and papers onto the 6" x 6" white base card.

I downloaded a free paper flower pattern from Pinterest and re sized the flowers on my computer and then cut the templates  out and traced them onto the Do Crafts Garden Party red spotty paper but if you cant find a template or don't like using Pinterest you could always use flower dies or shop bought flower embellishments. The largest flower is 3.6cm, the next flower is 3cm and the last flower is 2.2cm. You will need 1 x large flower, 2 x middle flowers and 1 x small flower.
Cut the flowers out and tint the edges of the petals using Tim Holtz Fired Brick Distress Ink and Cut n Dry foam to apply, bevel the petals.
Using the Tonic small flower boot punch and the yellow paper scraps punch out 4 flowers.
Stick the yellow flowers to the centre of the Garden Party dotty flowers.
Punch out 4 green dots using the small hole punch and stick a dot at the centre of each flower.
Stick the flowers onto the card.
Using the Tonic small flower boot punch and the Do Crafts Garden Party dotty paper punch out 4 flowers and 2 flowers from the yellow paper.
Punch out 4 dots from the yellow paper using the small hole punch.
Stick a yellow dot at the centre of each of the red dotty boot punch flowers.
Punch 2 dots from the green paper using the small hole punch.
Stick a green dot at the centre of the yellow boot punch flowers.
Stick the boot punch flowers onto the card.

Using the Little Claire Rebecca's Really Useful Female Sentiments Stamp Set select the birdie flower stamp and the sentiment of your choice and stamp onto white card using the black Versa Fine ink pad.
Cut the sentiment out.
Tint the edges of the sentiment using the Time Holtz Distress Inks Wild Honey, Ripe Persimmon and Fired Brick and applied using Cut n Dry foam.
Stick the sentiment onto the card. 

Punch out 2 dragonflies from the orange paper and stick onto the card.


Wednesday, 7 October 2015

Little Claire October digi Stamp Challenge


Today Little Claire are launching their October digi Stamp Challenge and the theme is Ribbons & Pearls. I thought that as this is a magical time of the year I would do a magical/mystical type of card for my inspirational card as part of the design team. If you would like to take part in the challenge just make a card using a digi stamp and ribbon & pearls and send a photo of it to Little Claire and you could be the lucky winner of this prize.......

FIVE - LITTLE CLAIRE DIGI-STAMPS


I thought I would do more in-depth recipes for cards made using digi images because it is sometimes difficult to work your way around a computer if you are not confident and believe me the digi images are so easy to use. The first thing I will mention is that I use Serif Craft Artist as my graphics program and if you have a different graphics program it will still do the same things as my Serif but I can not talk you through it the way I can with a Serif program.

what you will need:
Lttle Claire Whisper a Wish digi stamp
Little Claire dinkie text To Lovely You
Little Claire dinkie text Happy Birthday
black Versa Fine ink pad
5 3/4" x 5 3/4" white base card
Serif Craft Artist graphics program
Daisy Trail Midnight Garden digi kit - bought from the Serif Daisy Trail on line shop
blue line card
good quality 220gsm mat white print paper
220gsm white paper
black card scraps
lacy butterfly die
solid butterfly die
Midnight Blue Cosmic Shimmer
blue & purple chalks and Cut n Dry to apply chalks
black fine tip pen
Glossy Accents
3 small pearls
small pearl heart embellishment
Gelly Roll silver glitter pen
8mm wide black lace
Gutermann blue metallic thread & needle

Open up the Serif Craft Artist program on your computer and select "blank project" from the Get Started section.
Select A4 portrait from the Page Set Up section by double clicking on it.
Craft Artist will now take you to a page with digi kits on it and if you have purchased the Winter Garden digi kit it should appear in this section. Scroll down until you get to the Materials section and select the blue mushroom image by right clicking on it and it will appear in the Materials Sidebar. Click on the Done button at the bottom of the digi kit browser to close it.
On your A4 work space you will notice two rulers above and to the side of the workspace and if yours is like mine it opens by default in cm so to change this hover your cursor in the corner where the two rulers meet and right click, select inches from the drop down box.
You need to draw guide lines so move the cursor to the left hand ruler and left click and drag the red guide line out to 4 3/4". Hover the cursor over the ruler at the top and drag the red guide line down to 4 1/2".
Bring the blue mushrooms background image from the Materials section of the side bar by left clicking on the image and drag it onto the A4 work area and place it at the top of the work area within the guide lines.
Re size the image by hovering the cursor over the white square at the corner of the image till a double headed arrow appears, left click and drag the image to the correct size. If you need to adjust the size further repeat the last steps with any of the white squares.
You need to move the image from the edge of the work area because when you print an image the printer will leave a white border around the edge of the A4 paper and you do not want this to appear on your background image. You will notice a grey square with cross hairs at the top left of the image, left click and drag the image to a more central position on the work area.
Place the 220gsm white mat print paper in the printer.
Click on the file tab at the top of the screen and select print from the drop down box, select properties from the print pop up box, select photo from the properties pop up box and then select OK from the tab at the bottom.
When the image has printed take the paper and place it back into the printer exactly as it was loaded before (this is important because you are going to over print the digi stamp and it is essential that the images line up).
Left click on the insert tab at the top of the screen, select photo from the drop down box, select from file from the drop down box, select the Little Claire Whisper a Wish digi stamp from the place you filed it which will be displayed in the insert photos box, click on the open tab at the bottom of the box.
A cross with a box beneath it will appear on your work area, left click and drag the cursor, as you do the digi stamp image will appear.
You need to make the digi stamp transparent so you can see the background behind it and place it in the correct position for printing, so take the cursor over to the transparency slider bar at the right hand side of the screen, left click the button and drag it half way along the slider.
Grab the grey cross hairs and drag the digi stamp until the bottom of the image lines up with the bottom of the background.
Re size the digi stamp as before by left clicking on the white squares at the corners and drag to size.
Make the image no longer transparent by placing the cursor over the transparency bar button, left click, drag the button to the left till it reads 0%.
Remove the background image by clicking on it and then press delete on your key board.
Over print the digi stamp image using the same print technique used before (the printer will only print the black of the digi stamp as it assumes you are printing onto white).
THAT IS THE END OF THE COMPUTER/PRINTING STUFF FROM HERE ON ITS NORMAL CRAFTING......

You may find that you can see the background through the silhouette image and if this is the case simply colour in the image with the black fine tip pen (very therapeutic).
Cut the image to size (4 1/2" x 4 3/4").
Using the Gelly Roll silver glitter pen draw a faint line over the spiders web.
Run he edges of the image along the black Versa Fine ink pad (don't be too heavy handed as the Versa Fine ink pad is very juicy and you don't want to have splodges).
Apply the Glossy Accents to the dew on the mushrooms and allow to dry.
Mat and layer the image onto white 220gsm paper.

Cut the blue linen card to mat and layer onto the base card but do not stick down.
Stick the image topper to the blue linen card.
Stamp the Little Claire dinkie text "To Lovely You" and "Happy Birthday" using the black Versa Fine ink pad.
Cut the sentiments to size.
Colour the sentiments using the purple and blue chalks and applying with the Cut n Dry foam.
Stick the sentiments onto the card.

Cut a piece of the black lace so that it can lay on the card and wrap around the back of the card.
Take the Gutermann blue metallic thread, thread the needle and sew a running stitch along the edge of the lace.
tick the lace onto the card, wrap around the back and secure with tape.
Stick the blue linen card onto the white 5 3/4" x 5 3/4" base card.
Stick the little pearl heart embellishment to the card.

Using the butterfly die and scraps of black card cut out a lacy butterfly about 4cm and a small solid butterfly (my die has both of the butterflies but if you do not have the solid butterfly simply colour in the printed butterfly on the topper with the black fine tip pen).
Spritz the lacy butterfly with the Midnight Blue Cosmic Shimmer and allow to dry.
Stick the solid butterfly flat onto the card.
Fold the wings of the lacy butterfly back along the body and stick to the card covering the solid butterfly.
Stick 3 small pearl gems along the butterfly`s body.

USING A GRAPHICS PROGRAM IS ALWAYS A BIT SCARY AT FIRST BUT THE MORE YOU USE IT THE MORE FAMILIAR YOU WILL BECOME WITH IT AND THE RESULTS ARE AMAZING, SO PLEASE PERSEVERE.........